Rédiger une instruction de travail : méthode et exemples
Rédiger une instruction de travail que les opérateurs suivent vraiment : méthode en 9 étapes, exemples détaillés, photo ou dessin, et un modèle à copier.
Lundi matin, chez un équipementier de la région lyonnaise, un intérimaire démarre au poste bride. L'instruction de travail accrochée au poste dit : « Poser le joint et serrer les vis au couple spécifié, en vérifiant l'alignement selon le plan. » Une phrase, quatre décisions — sens du joint, valeur de couple, ordre de serrage, quel plan — et aucune réponse. Mercredi, le chef d'équipe a réexpliqué le poste trois fois, et l'instruction redevient un papier pour l'auditeur, pas pour l'opérateur. Savoir rédiger une instruction de travail, c'est éviter exactement cela, et les règles sont connues.
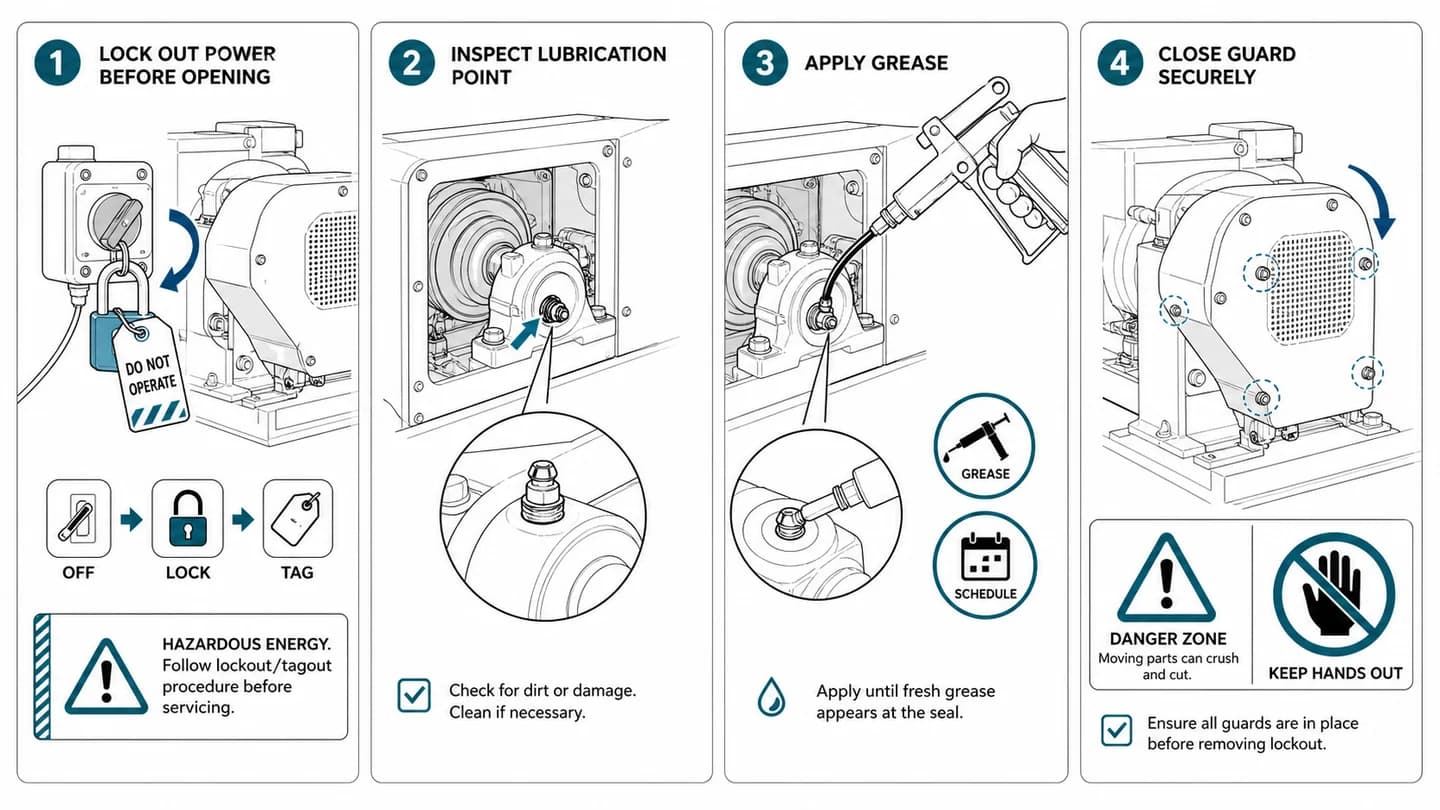
Au moment de passer aux figures, le générateur d'illustrations d'instructions de travail transforme une photo de la pièce en vignette d'étape numérotée, prête à l'emploi.
Ce guide couvre tout le processus : ce qu'est une instruction de travail (et ce qu'elle n'est pas), la méthode en neuf étapes, le contenu d'une étape, photo ou dessin, trois exemples détaillés et un modèle à copier.
Instruction de travail, mode opératoire, procédure : les définitions
Les termes se recouvrent dans la plupart des ateliers ; autant les fixer :
- Une procédure (ou document de processus) décrit comment le travail circule entre les postes : ce qui entre, ce qui sort, qui est responsable. Dans un système ISO 9001, c'est le niveau au-dessus.
- Un mode opératoire (SOP) décrit comment un rôle réalise une tâche complète, souvent sur plusieurs postes, avec responsabilités et cas particuliers.
- Une instruction de travail est plus étroite et plus précise : comment un opérateur réalise une tâche, à un poste, maintenant. Des étapes numérotées, une action chacune, une figure par étape, et les paramètres qui décident du conforme ou du non conforme.
Si votre document explique pourquoi la tâche compte ou qui valide les modifications, ce contenu relève de l'amont. L'instruction de travail est le dernier document avant que les mains ne touchent les pièces : tout ce qu'elle contient doit survivre à une lecture de huit secondes, debout.
Comment rédiger une instruction de travail en 9 étapes
1. Observez la tâche — ne rédigez pas de mémoire. Écrivez au poste, en regardant travailler l'opérateur le plus expérimenté. Ce que l'on croit faire et ce que l'on fait diffèrent précisément sur les détails qui créent les défauts : quelle main tient la pièce, quelle vis part en premier, à quel moment le clic s'entend.
2. Fixez les limites. Une instruction couvre une tâche, avec un état de départ (« pièces en kit sur l'établi, montage vide ») et un état final (« ensemble serré au couple, étiquette posée, sur le rack de sortie »). Si vous ne pouvez pas énoncer chacun en une ligne, le périmètre est trop large : découpez.
3. Listez d'emblée pièces, outils et sécurité. Tout ce qu'il faut avant l'étape 1 : composants, consommables, outils avec leurs tailles, EPI, et les vérifications de consignation ou de protecteurs. Un opérateur qui découvre à l'étape 6 qu'il lui manque un outil improvise, et c'est dans l'improvisation que naissent accidents et rebuts.
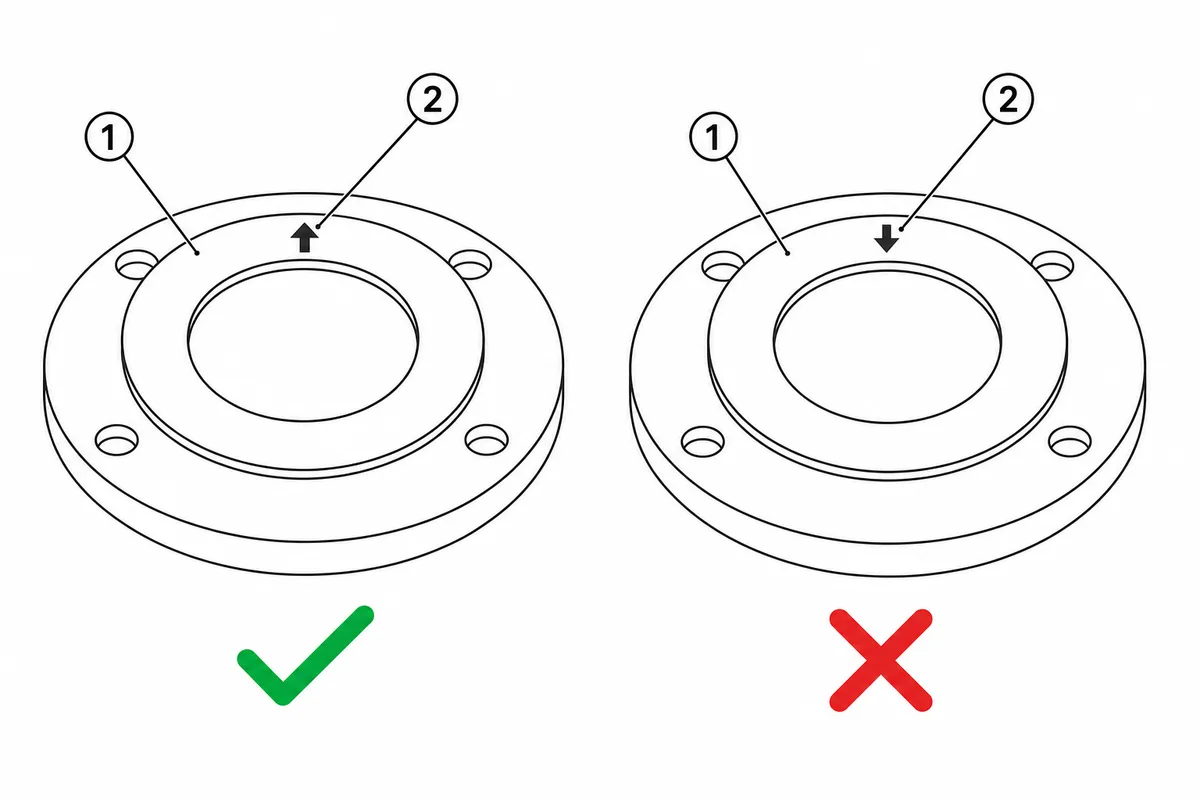
4. Une action par étape. Chaque étape est un verbe que l'opérateur accomplit avant de revenir au document : « Poser le joint sur la face de la bride, flèche vers le haut. » Pas « Poser le joint et les vis. » Un « et » dans une étape, c'est généralement deux étapes.
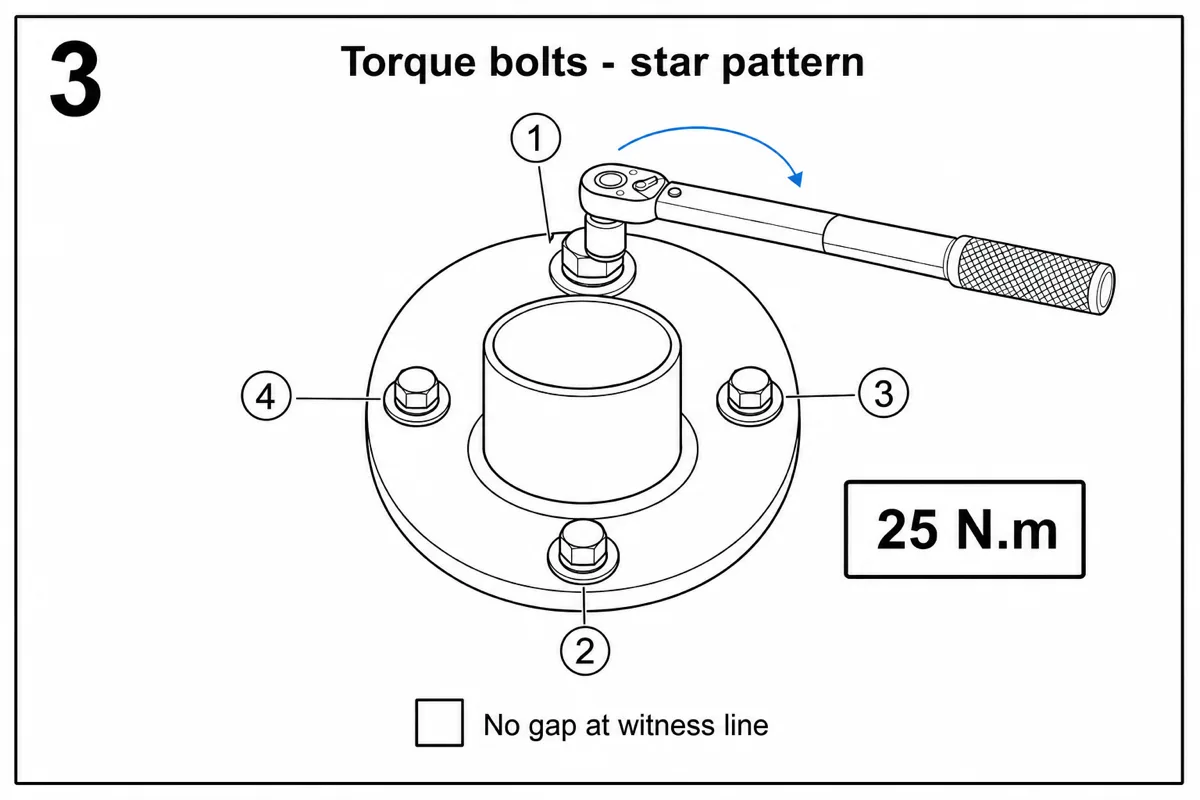
5. Mettez les paramètres conforme / non conforme dans l'étape. Couples, ordre de serrage, temps de polymérisation, jeux admissibles, pressions d'essai : dans l'étape où ils s'appliquent, pas dans un tableau en fin de document. « Serrer à 25 N·m en étoile » va dans l'étape, en gras, avec l'unité.
6. Une figure pour chaque position, orientation ou sens. Le texte transmet bien les valeurs, mal la géométrie. Tout ce qui a un bon côté, un bon ordre ou un bon sens mérite une image — et c'est l'image qui explique, pas la phrase.
7. Signalez les modes de défaillance. Partout où la ligne a réellement produit un défaut, ajoutez une vignette correct / incorrect : la bonne orientation avec une coche, la mauvaise orientation observée avec une croix. C'est la figure la plus précieuse du document : elle consigne l'expérience du poste.
8. Testez sur quelqu'un qui n'a jamais fait la tâche. Confiez le brouillon à une personne d'une autre ligne et observez en silence. Chaque hésitation, question ou improvisation est un défaut du document, pas du lecteur. Corrigez et recommencez jusqu'à ce qu'une personne extérieure réalise la tâche sans question.
9. Indicez et faites approuver. Date, indice de révision, rédacteur, approbateur — puis affichez la version en vigueur au poste et détruisez les copies périmées, comme l'exige la maîtrise des informations documentées en ISO 9001. Avec une plateforme de diffusion, c'est son rôle ; sinon, un PDF maîtrisé issu d'un modèle d'instruction de travail verrouillé suffit tant que le volume reste raisonnable.
Ce que contient une bonne étape
Une bonne instruction de travail paraît répétitive, et c'est voulu. Chaque étape suit le même squelette :
- Le numéro d'étape — assez grand pour être retrouvé après avoir détourné le regard.
- Une phrase d'action — verbe à l'infinitif en tête : « Insérer », « Serrer », « Vérifier ». Moins de 15 mots.
- La figure — la pièce vue depuis la place de l'opérateur, la pièce en mouvement mise en évidence, une flèche pour le mouvement.
- Les paramètres en gras — les valeurs qui font le conforme ou le non conforme, avec leurs unités.
- Un contrôle — ce que l'opérateur doit voir, entendre ou sentir si l'étape est réussie : « à fleur du boîtier », « clic audible », « aucun jeu au trait témoin ».
Sans contrôle, la première personne à découvrir qu'une étape a échoué, c'est le contrôle final — l'endroit où l'apprendre coûte le plus cher.
Photo ou dessin au trait ?
Les deux ont leur place ; le critère, c'est le bruit visuel.
La photo l'emporte quand l'aspect est l'enjeu : position d'une étiquette, code couleur, critère d'aspect. C'est aussi le plus rapide à capturer, et c'est pourquoi la plupart des instructions naissent en documents photo.
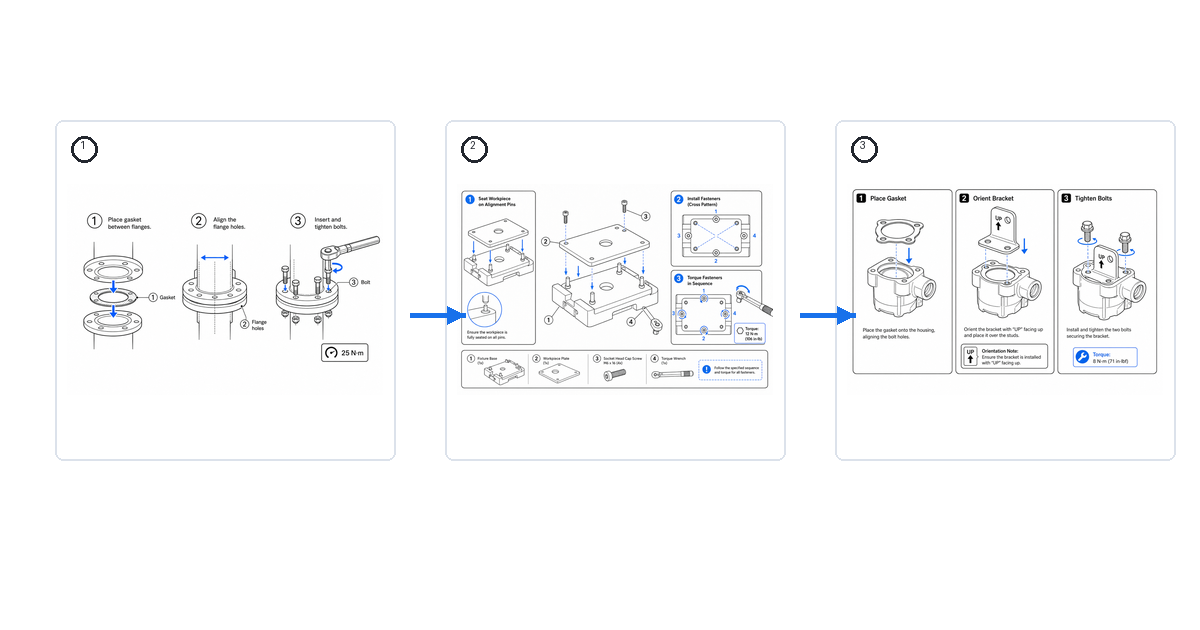
Le dessin au trait l'emporte quand la géométrie est l'enjeu, c'est-à-dire pour la plupart des étapes. Il supprime l'établi encombré, les reflets sur le carter et les dix-sept pièces sans importance pour ne garder que celle qui compte. Il supporte l'impression en niveaux de gris et la réduction sur un écran de poste, et reste valable quand l'établi ou l'éclairage change. Son coût traditionnel — des heures de décalque par figure — s'est effondré : une photo de la pièce se convertit en dessin au trait prêt pour la notice en quelques minutes, repères et flèches compris. La collection d'exemples d'instructions de travail montre les styles côte à côte.
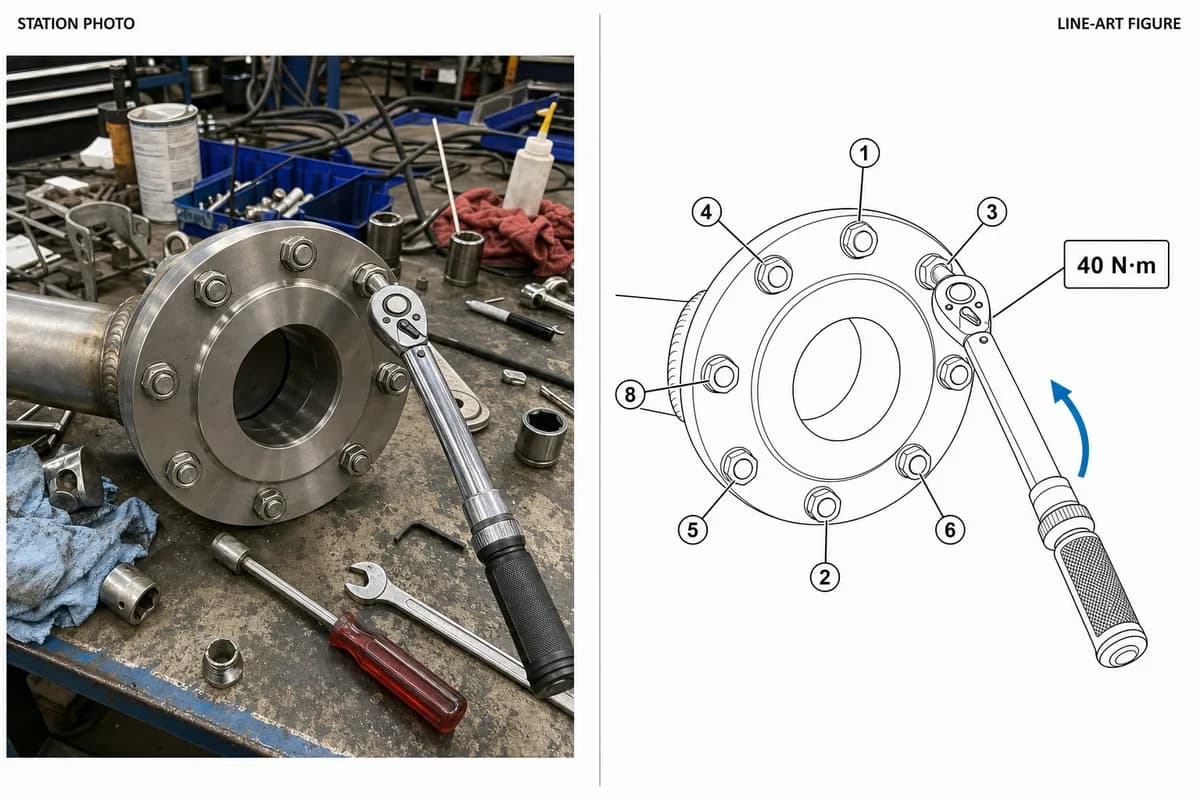
En pratique : prenez des photos au poste pendant l'observation (étape 1), convertissez en dessins les étapes qui portent de la géométrie, et ne gardez les photos que là où c'est l'aspect lui-même qui est contrôlé.
3 exemples d'instruction de travail
Poste de montage — bride et joint. Huit étapes. La liste des pièces montre le joint avec sa flèche d'orientation mise en évidence. Les étapes 3 à 5 sont des figures : joint posé flèche vers le haut, vis engagées à la main dans l'ordre numéroté, clé dynamométrique sur la séquence en étoile avec 25 N·m dans le texte. L'étape 5 porte une vignette correct / incorrect tirée d'un défaut réellement rencontré : joint retourné. Contrôle : « aucun bord de joint ne dépasse de la bride, en aucun point ».
Maintenance — remplacement du filtre d'une ensacheuse dans une usine agroalimentaire. D'abord le bloc sécurité : consignation, vérification d'absence d'énergie. Puis six étapes, chacune avec sa figure : déverrouillage du capot, sens de rotation du filtre (flèche courbe), mise en place du joint (cercle de détail sur la gorge), serrage du capot au couple. Le contrôle final est un essai d'étanchéité avec un seuil d'acceptation, pas « vérifier que tout est OK ».
Contrôle qualité — inspection finale d'un petit appareil électroménager. Une instruction en liste de contrôle où chaque point associe une figure à une limite : connecteur entièrement enfiché (à fleur, aucune dorure visible), présence des vis par comptage sur une figure numérotée, étiquette dans la zone repérée. Chaque point est binaire — conforme ou non conforme — parce que « contrôler la qualité » n'est pas une instruction.
Modèle d'instruction de travail à copier
La trame qui porte les trois exemples ci-dessus :
- En-tête — nom de la tâche, poste, indice, date, rédacteur, approbateur.
- Bloc sécurité — EPI et états énergétiques, avec pictogrammes.
- Pièces et outils — illustrés, pas seulement listés, pour vérifier le kit d'un coup d'œil.
- Étapes — vignettes numérotées : une action + une figure + les paramètres + un contrôle.
- Modes de défaillance — vignettes correct / incorrect pour les défauts réellement rencontrés au poste.
- Ligne de visa — formé par, date, si vous fonctionnez sans plateforme.
La page modèle d'instruction de travail propose cette structure en fichier Word modifiable, téléchargeable sans laisser d'adresse e-mail, avec un exemple complet où chaque étape est déjà illustrée. Le générateur d'instructions de travail en production couvre spécifiquement les styles de figures d'atelier.
Où intervient ManualFig — et où il n'intervient pas
ManualFig prend en charge une partie du processus : l'étape 6. Il transforme les photos de votre pièce en dessins au trait, vignettes numérotées, flèches et comparaisons correct / incorrect qui rendent les étapes lisibles. Il ne capture pas votre savoir process : couples, séquences et contrôles viennent de vos chefs d'équipe et de l'observation du travail. Et ce n'est pas une plateforme de diffusion : maîtrise des révisions, visas opérateur et intégration MES relèvent du versant plateforme du marché.
FAQ
Quel niveau de détail pour une instruction de travail ?
Assez pour qu'une personne extérieure, formée aux bases, réalise la tâche sans poser de question : c'est le test de l'étape 8, et le seul critère qui ne dérive pas. Au-delà, le détail alourdit la lecture sans améliorer le rendement.
Combien de temps faut-il pour rédiger une instruction de travail ?
Observation et rédaction d'une tâche de poste typique de 8 à 12 étapes : une matinée. Le goulot historique — une figure propre par étape — se compte désormais en minutes par figure à partir de photos, ce qui rend la règle « une figure par étape » tenable.
Qui doit rédiger les instructions de travail ?
Un binôme : la personne qui connaît la tâche (chef d'équipe, opérateur expérimenté) apporte le savoir ; quelqu'un d'un peu plus éloigné rédige, car les experts sautent les étapes qu'ils ne se voient plus faire. Le test de la personne extérieure rattrape ce qui échappe aux deux.
Word, Excel ou logiciel dédié ?
Un modèle Word ou PDF maîtrisé suffit pour démarrer ; une plateforme devient utile quand le nombre de postes, de révisions ou les exigences d'audit augmentent. Le comparatif des logiciels d'instruction de travail détaille les options.
Voir aussi : exemples d'instructions de travail, modèle d'instruction de travail.
Auteur

Chercheur · University of Arts in Poznan
Davie Chen est chercheur à la Faculté d’animation et d’intermédia de la University of Arts in Poznan. Ses travaux portent sur l’IA générative appliquée aux figures scientifiques, aux illustrations de brevet, aux visuels d’instructions et à la rédaction académique. ManualFig AI est l’un des outils issus de ces recherches.
Voir le profil de l’auteurCatégories
Plus d'articles
Exemples et modèles d'instruction de travail (avec visuels)
Exemples concrets d'instructions de travail visuelles pour l'assemblage, le contrôle et le changement de série : à quoi ressemble un bon modèle et comment créer le vôtre.
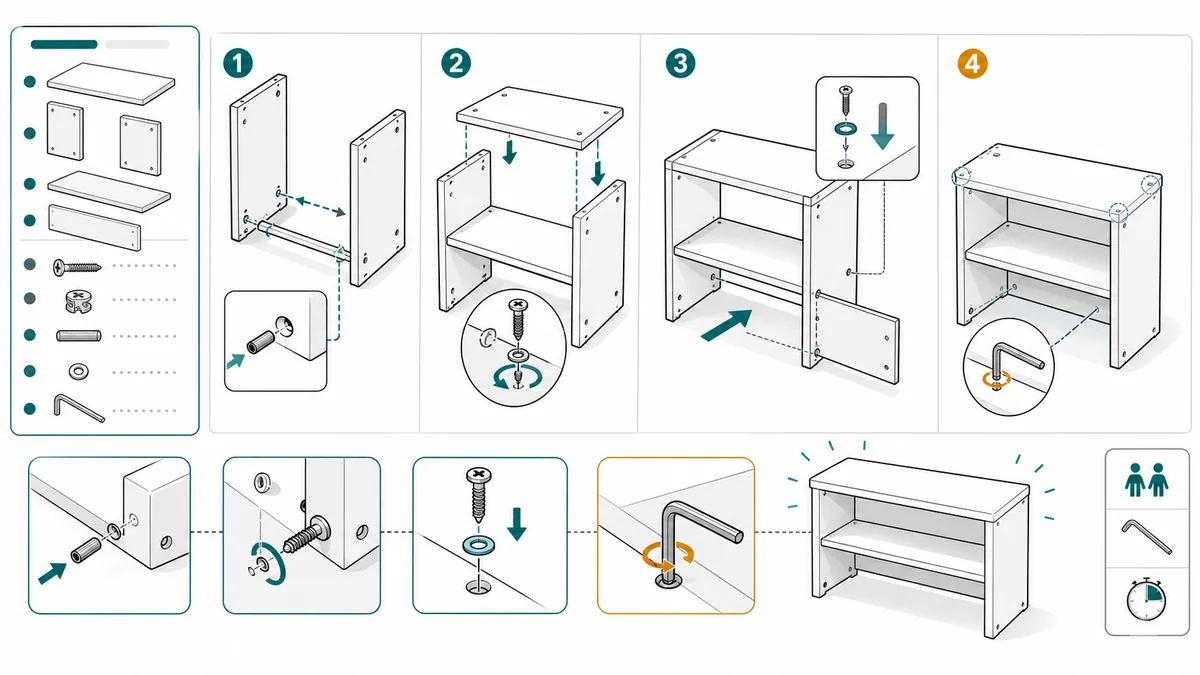
Dessins de notice de montage : flèches, pièces, fixations et mise en page
Un guide pratique des dessins de notice de montage : structure des vignettes, flèches, repères de pièces, détails des fixations, avertissements et vérifications finales.
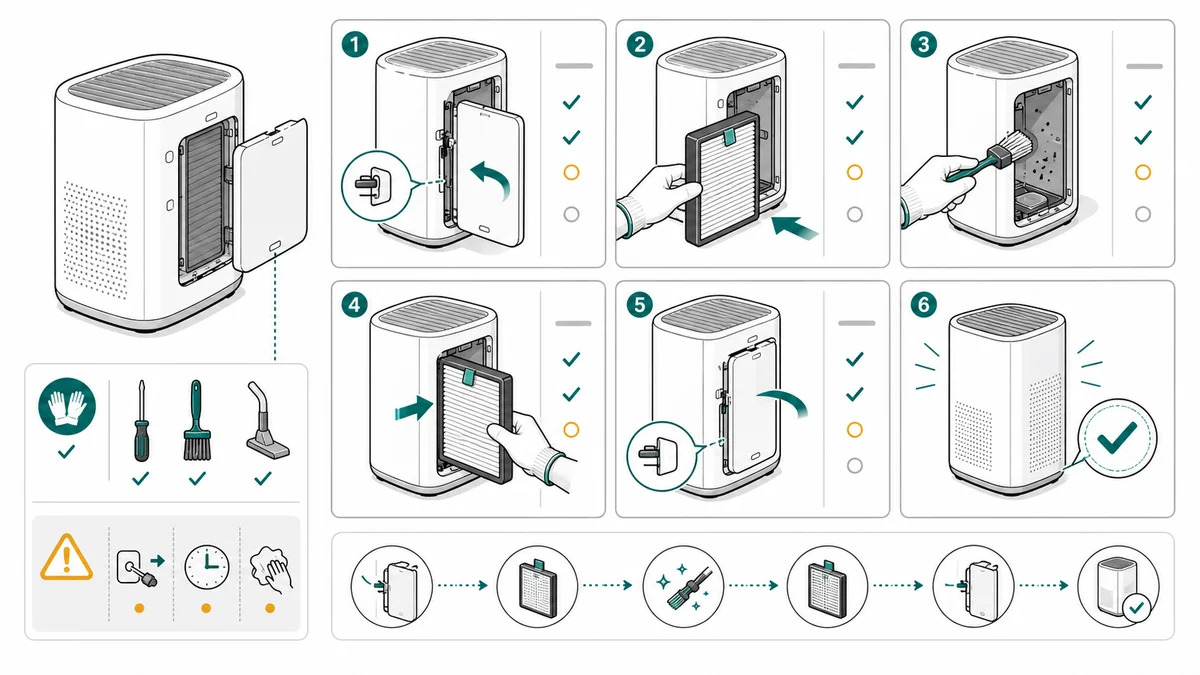
Liste de contrôle pour les illustrations de procédure de maintenance
Une liste de contrôle pour créer des illustrations de procédure de maintenance : nettoyage, remplacement, inspection, filtres, étapes d'entretien, avertissements et vérifications finales.