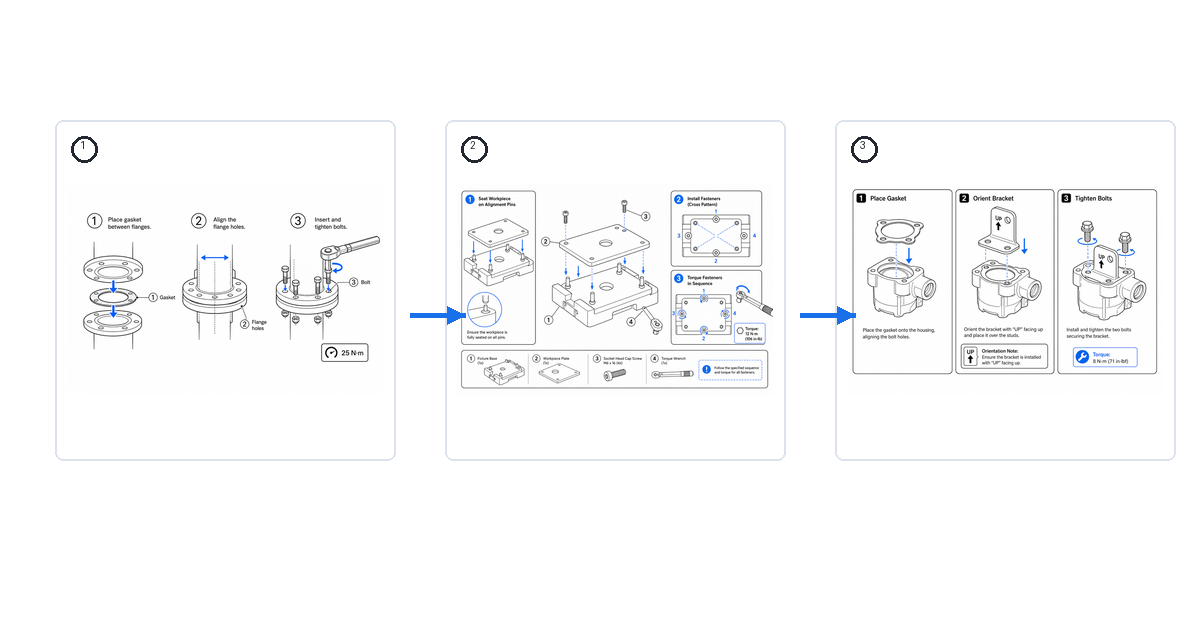
Work Instruction Examples and Samples (With Visuals)
Real examples of visual work instructions for assembly, inspection, and changeover — what a good sample looks like and how to generate your own.
It is day three for a new operator at station 4. The line lead who built this assembly seven years ago can torque the bracket, seat the connector, and run the first-article check without looking. The new operator cannot — and the only document at the station is a wall of text printed in 9-point font, three revisions out of date, with no pictures. So the new operator does what every new operator does: copies the person at the next bench, learns one undocumented habit, and quietly invents a fourth way to build the same part.
That gap is exactly what a good work instruction is supposed to close. The fix is not a longer document. It is a clear sample anyone on the floor can copy: numbered steps, one action each, a picture per step, and the few callouts that actually matter — torque, fastener order, pass or fail. The fastest way to write a standard is to start from a strong example and replace the content.
Generate illustrated steps with the Work Instruction Illustration Generator, or build a reusable format with the Work Instruction Template.
What every work instruction sample should have
A work instruction sample is not a procedure essay. It is a job aid the operator scans while their hands are busy. Strip it down to what a person standing at the station actually needs:
- A clear task title and the exact station or product number it applies to
- A revision number and date so the floor knows it is current
- Numbered steps, one action per step, ordered left to right and top to bottom
- A figure per step showing the workpiece, the tool, and the action — not a marketing photo
- Callouts for torque values, fastener order, and orientation placed at the contact point
- A correct vs incorrect panel wherever operators repeatedly make the same mistake
- A defined end state per step: seated, flush, locked, indicator green
- Space for the operator's sign-off or scan if the step is quality-critical
The discipline is selective detail. A good sample shows the one thing that matters in this step at full clarity and lets everything else fade into light reference lines. The moment a step needs a paragraph to explain what the picture should have shown, the picture is wrong.
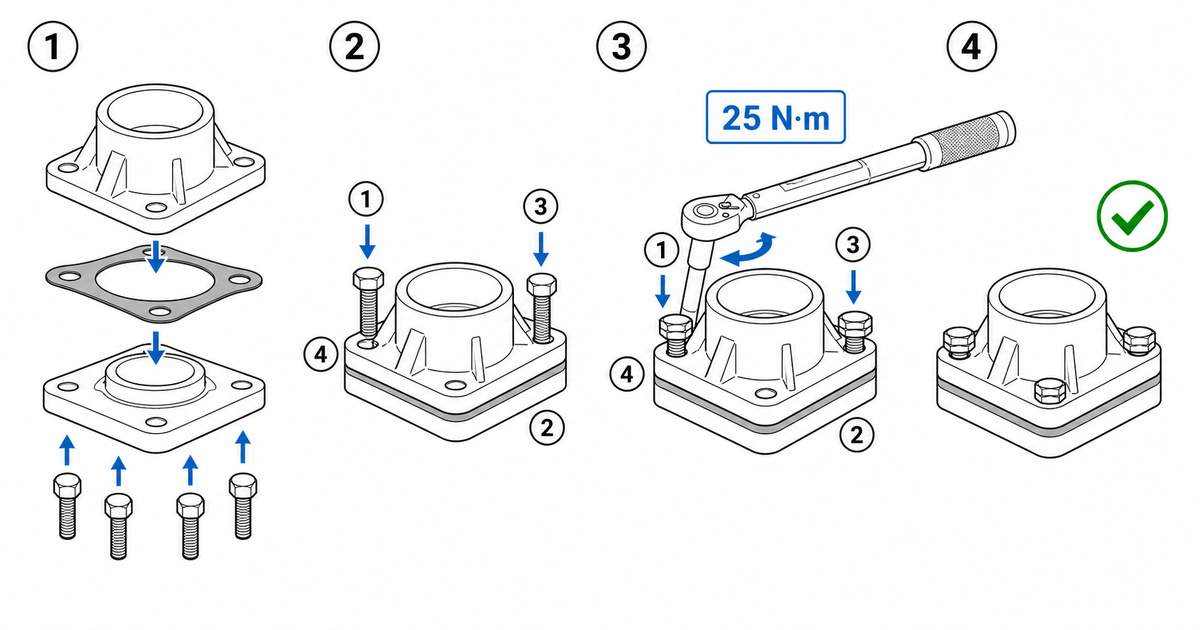
Worked example 1: an assembly step
Take a flanged housing that gets a gasket and four bolts. A weak instruction says "install gasket and bolts." A strong one breaks it into discrete, picturable actions:
- Seat the gasket. Panel shows the gasket aligned to the bore, a blue arrow pressing it home, and the end state: gasket flush, no pinch.
- Align the flange. Arrow shows the mating direction; a small callout flags the alignment pin so the operator cannot clock it 180° wrong.
- Run the bolts in a star pattern. This is where most assembly errors live. Number the bolts 1–2–3–4 in the cross sequence and draw the order on the panel. Add the torque callout at the bolt head: → 25 N·m.
- Final pass. Show a check mark and the end state: flange seated evenly, no gap.
The fastener order is the load-bearing detail. "Tighten the four bolts" and "tighten 1‑3‑2‑4 to 25 N·m in two passes" produce different parts off the same line. The visual carries the sequence faster than any sentence.
Worked example 2: an inspection step
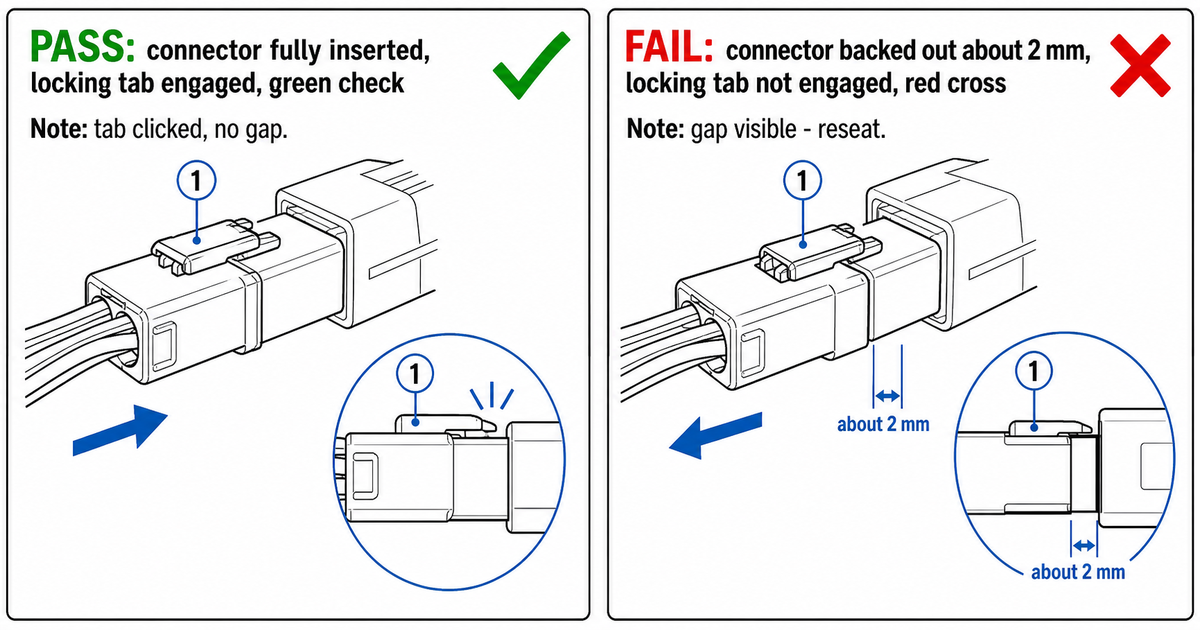
Inspection instructions fail when they describe the standard instead of showing it. "Verify connector is fully seated" assumes the operator already knows what fully seated looks like — which is the exact thing a day-three operator does not know.
A strong inspection sample uses a correct vs incorrect panel side by side:
- Pass. Connector pushed home, locking tab engaged, a green check mark and the words "tab clicked, no gap."
- Fail. Same connector backed out 2 mm, tab not engaged, a red cross and "gap visible — reseat."
Add a numbered callout pointing at the one feature that distinguishes the two states — here, the locking tab — so the operator's eye goes straight to the decision point. For a small feature, include a close-up. The output of the step is a binary the operator can act on: pass continues the build, fail loops back to reseat. No judgment call, no asking the neighbor.
Worked example 3: a changeover step
Changeover is where tribal knowledge hides. The line lead can swap the line from product A to product B in twenty minutes; nobody else can do it under an hour, and the document — if it exists — says "change tooling per setup sheet." Make the setup repeatable by anyone:
- Stop and lock out the station; show the energy-isolation point.
- Remove the current fixture. Arrow shows the release latch and lift direction; callout names the fixture ID so the right one comes off.
- Swap the tooling. Show the new tool seated in the correct orientation, with the keyed feature highlighted.
- Set the stop / parameter. Call out the exact dimension or machine setting — "stop at 42.0 mm," "program P7" — not "adjust as needed."
- Run a first-article check. Show the first-article feature, the gauge, and the pass criterion before releasing the line to production.
The first-article check is what makes a changeover a controlled event instead of a hopeful one. Document it as its own numbered, pictured step and the changeover stops depending on who is on shift.
A reusable template structure
Every example above shares one skeleton. Lock that skeleton down once and every future instruction inherits it:
- Header: task title, product/station number, revision, date, author
- Materials & tools: parts, fasteners, torque tools, fixtures, gauges
- Safety: PPE and hazards, placed next to the step that creates the risk — not buried at the top
- Steps: number, one-line action, figure, callouts, end state
- Quality checks: inline pass/fail panels and any sign-off or scan
- Footer: reference docs, related instructions, change history
Keep step text to one short imperative line. The figure carries the how; the text carries the what and the spec value. Short text also survives translation — a label that fits in English but overflows in another language will break the layout on a global line.
A prompt template you can reuse
Once the structure is fixed, generating the figures is a fill-in-the-blank exercise. Use one prompt per step so the style stays identical across the whole instruction:
Create a visual work-instruction panel as clean line art on a white background.
Subject: [workpiece, e.g. flanged housing with gasket and four bolts].
Action: [one action, e.g. run bolts in a star pattern 1-3-2-4].
Show: the tool [e.g. torque wrench], a blue action arrow on the motion,
numbered callouts, and a torque callout "→ 25 N·m" at the bolt head.
End state: [e.g. flange seated evenly, no gap], marked with a check.
Style: black/grey line art, blue arrows, numbered callouts, no logo,
no shadows, no brand text. Leave margin for a short caption.
For an inspection step, swap the action line for a correct-vs-incorrect instruction:
Create a correct-vs-incorrect inspection panel as clean line art.
Left: [feature] in the PASS state, green check, label "[criterion]".
Right: same [feature] in the FAIL state, red cross, label "[defect]".
Point one numbered callout at the distinguishing feature.
Style: black/grey line art, blue arrows, no logo, no shadows.
Common mistakes to avoid
- Writing paragraphs where a numbered step belongs — operators skim, they do not read
- "Tighten the bolts" with no torque value and no order
- Inspection steps that name the standard but never show pass vs fail
- One photo of the finished assembly standing in for every step
- Safety warnings collected at the top instead of next to the risky action
- Labels so long they break after translation
- Steps that end with no defined state, so "done" is a matter of opinion
- A sample that looks different on every station because each author drew it their own way
From sample to standard
A single good example is a sample. A folder of examples that all share one line-art style, the same arrow language, the same callout format, and the same end-state convention is a standard. That consistency is the whole point — it lets a day-three operator read station 4, station 9, and station 14 with the same eyes.
Reuse the same prompts and presets so every step inherits one look. Refine any step in the full workbench and export PNG or SVG into your MES, traveler, or training deck. When the part changes, edit the prompt and regenerate — the figure stays in family instead of becoming a fifth way to build the part.
FAQ
What is the difference between a work instruction and a standard operating procedure?
An SOP describes a process at the policy level — what must happen and who owns it. A work instruction is the station-level job aid that shows an operator exactly how to perform one task, step by step, usually with a figure per step. An SOP might say "assemble per WI‑4012"; the work instruction is WI‑4012.
How detailed should a work instruction sample be?
Detailed enough that a new operator can complete the task correctly without asking a neighbor, and no more. One action per step, a figure per step, and a spec value only where it changes the outcome (torque, order, dimension, pass/fail). If a step needs a paragraph, the figure is doing too little.
What makes a work instruction "visual" rather than just illustrated?
A visual work instruction leads with the figure and uses text as the caption, not the other way around. The arrow shows the motion, the callout shows the spec, and the end state shows "done." Digital work instructions go further — the same figures live on a screen at the station, version-controlled, so the floor always sees the current revision.
How do I keep instructions consistent across many stations?
Lock the template and the figure style once, then reuse the same prompts and presets for every step. Consistent arrows, callouts, and end-state conventions let operators move between stations without relearning how to read the document.
Related: How to Write Work Instructions, Work Instruction Template, Digital Work Instructions Software, Manufacturing Work Instructions Generator.
Author

Researcher · University of Arts in Poznan
Davie Chen is a researcher at the Faculty of Animation and Intermedia, University of Arts in Poznan, studying generative AI for scientific figure creation, patent illustration, instruction graphics, and manuscript drafting. ManualFig AI is one of the research-to-product tools built from this work.
View author profileCategories
More Posts

Assembly Instruction Drawings: Arrows, Parts, Fasteners, and Layout
A practical guide to assembly instruction drawings: panel structure, arrows, part callouts, fastener details, warnings, and final checks.

Maintenance Procedure Illustration Checklist
A checklist for creating maintenance procedure illustrations for cleaning, replacement, inspection, filters, service steps, warnings, and final checks.

How to Write Work Instructions (Step-by-Step, With Examples)
A practical guide to writing work instructions operators actually follow: the 9-step process, one-action steps, photos vs. illustrations, torque and QC callouts, and a reusable template.