AI Assembly Instructions Generator
Turn product photos into clear assembly instructions
Show the next part, correct orientation, fastener, tool, motion, and completion check in a numbered sequence.
Assembly instruction figure
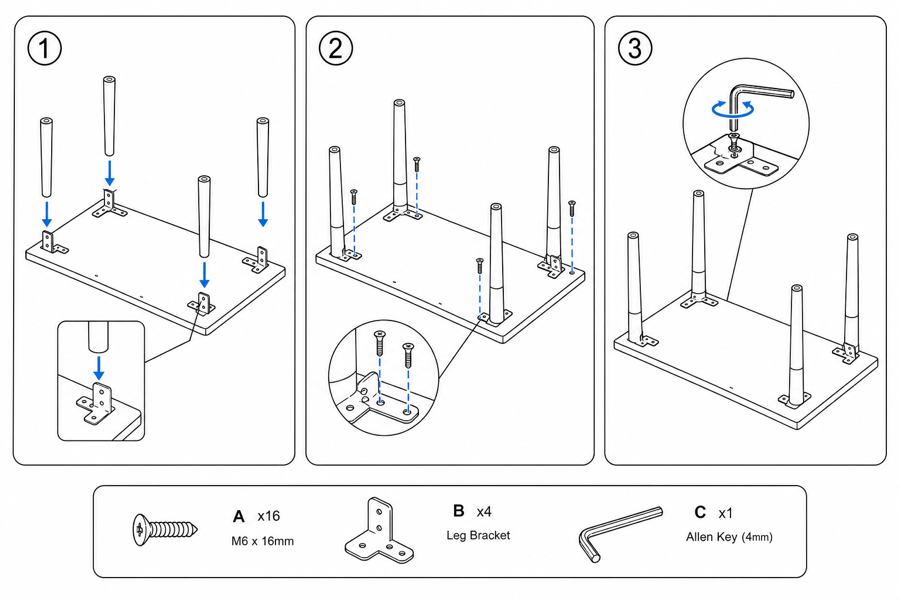 Example output
Output: manual-ready line art
Assembly pages this supports
Use assembly visuals where parts, order, and orientation must be unambiguous.
Part-by-part assembly
Show the next part, where it fits, which side faces up, and which fastener is used.
Exploded views and callouts
Create clear part separation, alignment arrows, hardware details, and zoomed connections.
Safety and final checks
Add pinch cautions, load warnings, wall anchors, lock checks, and correct/incorrect states.
Assembly visuals that reduce orientation mistakes
Assembly diagrams need to show the next part, the correct side, the connection point, and the final check.


- Prompt: "Lay out this hardware bag as a labeled parts panel with letters and quantities."
- Human edits: renamed generic labels to match the printed step references (A–E).
- Exported as SVG for the printed manual page one.

- Prompt: "One completion panel: re-tighten all bolts, check shelf level, anchor the anti-tip strap."
- Human edits: added the wall-anchor warning triangle the generator left out.
- Exported as PNG for the last page of the assembly guide.
From product reference to manual-ready output
ManualFig keeps the prompt, uploaded references, generated options, revisions, and exports in one browser workflow.
Upload or describe the product
Start from a product photo, CAD screenshot, sketch, existing manual page, or a short step list.
Generate the instruction visual
Create line art, numbered panels, arrows, callouts, detail views, warnings, and completion checks.
Refine and export
Select a result, revise it with text, keep versions together, and export PNG or SVG for documentation.
Related ManualFig pages
Use a hardware layout, part list, product photo, or CAD screenshot to draft assembly panels. Human review keeps part labels, quantities, tightening order, and safety-critical details aligned with the approved build record.
Assembly Instruction Illustration FAQ
Can ManualFig create assembly instruction illustrations?
Yes. Provide part references, photos, CAD screenshots, or assembly steps, then generate assembly diagrams with arrows and callouts.
Can I create exploded assembly views?
Yes. Ask for exploded views, part callouts, hardware details, and alignment arrows.
Can this support furniture assembly?
Yes. Furniture assembly is a strong use case, including screws, dowels, cam locks, brackets, and anti-tip warnings.
Can I revise one generated panel?
Yes. Select the panel and describe the correction, such as changing arrow direction, adding a tool, or removing extra detail.
Can it make IKEA-style assembly instructions?
Yes. Choose the IKEA-style preset or ask for wordless numbered panels, simplified parts, hardware at scale with quantities, and blue motion arrows. The output follows the conventions flat-pack furniture buyers already know; part numbers and quantities still come from your bill of materials.
Generate your first assembly instruction visual
Upload product or part references, describe the assembly step, and create a clear diagram.