작업지시서 작성법: 9단계 절차와 양식·예시
작업자가 실제로 따르는 작업지시서 작성법. 9단계 작성 절차, 한 단계 한 동작 원칙, 사진과 일러스트 선택, 토크·품질 표시, 바로 쓰는 작업지시서 양식과 작업표준서와의 차이까지 정리했습니다.
월요일 아침, 입사 첫 주인 외국인 작업자가 플랜지 조립 공정에 배치됩니다. 공정 옆 클립보드의 작업지시서에는 이렇게 적혀 있습니다. "개스킷 장착 후 볼트를 규정 토크로 체결하고, 도면에 따라 정렬을 확인할 것." 한 문장에 판단이 네 가지입니다. 개스킷은 어느 방향인지, 토크는 몇 N·m인지, 볼트는 어떤 순서인지, 어느 도면을 말하는지. 문서는 어느 것에도 답하지 않습니다. 수요일쯤이면 반장이 같은 설명을 세 번째 하고 있고, 작업지시서는 원래 자리로 돌아갑니다. 작업자가 아니라 심사원을 위해 존재하는 종이 말입니다.
작업지시서 작성법에는 이미 알려진 규칙이 있고, 특별히 어려운 것은 없습니다. 이 글에서는 작업지시서가 무엇인지(작업표준서와 어떻게 다른지), 작성하는 9단계, 한 단계에 들어가야 할 내용, 사진과 라인 드로잉을 언제 쓰는지, 실전 예시 세 가지, 그대로 쓸 수 있는 작업지시서 양식을 차례로 다룹니다.
도해 작업에 이르면 작업 지시 일러스트 생성기가 공작물 사진 한 장을 번호가 매겨진, 바로 쓸 수 있는 단계 패널로 바꿔 줍니다.
작업지시서란? 작업표준서·SOP와의 차이
현장에서 이 용어들은 자주 섞여 쓰이므로 먼저 정리해 두겠습니다.
- **공정 문서(공정 흐름도 등)**는 공정 사이에서 작업이 흐르는 방식을 설명합니다. 무엇이 들어오고, 무엇이 나가고, 누가 책임지는지입니다.
- **표준 작업 절차서(SOP)**는 한 직무가 하나의 업무 전체를 수행하는 방법을 설명합니다. 여러 공정에 걸치는 경우가 많고 책임과 예외 처리를 포함합니다.
- **작업지시서**는 더 좁고 더 구체적입니다. 작업자 한 명이 한 공정에서 작업 하나를 지금 어떻게 하는지를 다룹니다. 번호 매긴 단계, 단계마다 동작 하나, 단계마다 도해 한 장, 그리고 합격과 불합격을 가르는 수치입니다.
작업표준서는 국내 제조 현장에서 이 작업지시서와 거의 같은 자리에 놓이는 문서입니다. 회사에 따라 공정별 표준 작업 방법을 정한 문서를 작업표준서라 부르고, 그 기준에 따라 현장에 내리는 문서를 작업지시서라 부르기도 하며, 둘을 하나로 운영하는 곳도 많습니다. 이름이 무엇이든 아래 작성 원칙은 똑같이 적용됩니다.
문서가 그 작업이 왜 중요한지, 변경을 누가 승인하는지 설명하고 있다면 그 내용은 상위 문서로 보내십시오. 작업지시서는 손이 부품에 닿기 직전의 마지막 문서이고, 모든 내용이 선 자세로 8초 안에 읽혀야 합니다.
작업지시서 작성법 9단계
1. 기억을 옮겨 적지 말고 작업을 관찰합니다. 공정 현장에서, 가장 숙련된 작업자가 일하는 모습을 보며 쓰십시오. 사람들이 한다고 기억하는 것과 실제로 하는 것은 하필 불량을 만드는 세부에서 다릅니다. 어느 손으로 부품을 잡는지, 어느 볼트부터 시작하는지, 언제 딸깍 소리가 나는지 같은 것입니다.
2. 범위를 정합니다. 작업지시서 하나는 작업 하나를 다루고, 시작 상태("키팅된 부품이 작업대 위에, 지그는 비어 있음")와 종료 상태("토크 체결 완료, 식별표 부착, 출하 랙에 적재")가 분명해야 합니다. 각각 한 줄로 쓸 수 없다면 범위가 너무 크니 나누십시오.
3. 부품, 공구, 안전 조건을 맨 앞에 둡니다. 1단계 전에 갖춰야 할 모든 것입니다. 부품, 소모품, 규격이 적힌 공구, 보호구, 그리고 잠금·표지(LOTO)나 방호 장치 점검. 6단계에서야 공구가 없다는 걸 알게 된 작업자는 임기응변을 하고, 임기응변은 부상과 불량이 생기는 곳입니다.
4. 작업을 동작 하나짜리 단계로 쪼갭니다. 각 단계는 문서를 다시 보기 전에 끝낼 수 있는 동사 하나입니다. "개스킷을 플랜지 면에 화살표가 위로 가도록 놓는다." "개스킷과 볼트를 장착한다"가 아닙니다. 한 단계에 "~하고"가 보이면 대개 두 단계입니다.
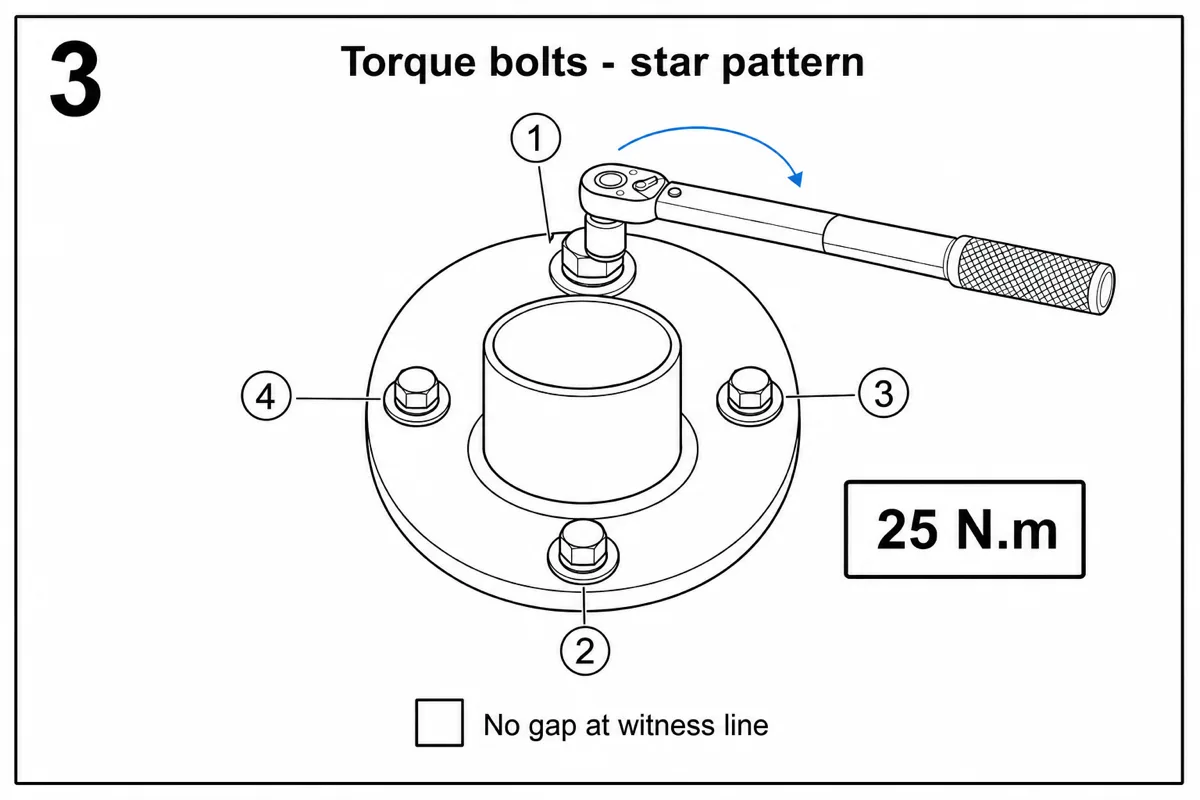
5. 합격·불합격을 가르는 수치를 붙입니다. 토크 값, 볼트 체결 순서, 경화 시간, 간극 한계, 시험 압력은 끝에 붙은 표가 아니라 해당 단계 안에 넣습니다. "대각선(별) 순서로 25 N·m 체결"은 단계 안에, 굵은 글씨로, 단위와 함께 들어가야 합니다.
6. 위치, 방향, 이동 방향이 관련된 모든 단계에 도해를 넣습니다. 글은 수치는 잘 전달하지만 형상은 잘 전달하지 못합니다. 올바른 면, 올바른 순서, 올바른 방향이 있는 것에는 모두 그림을 붙이고, 설명은 문장이 아니라 그림이 하게 하십시오. 한국어가 서툰 외국인 작업자가 많은 현장이라면 더욱 그렇습니다.
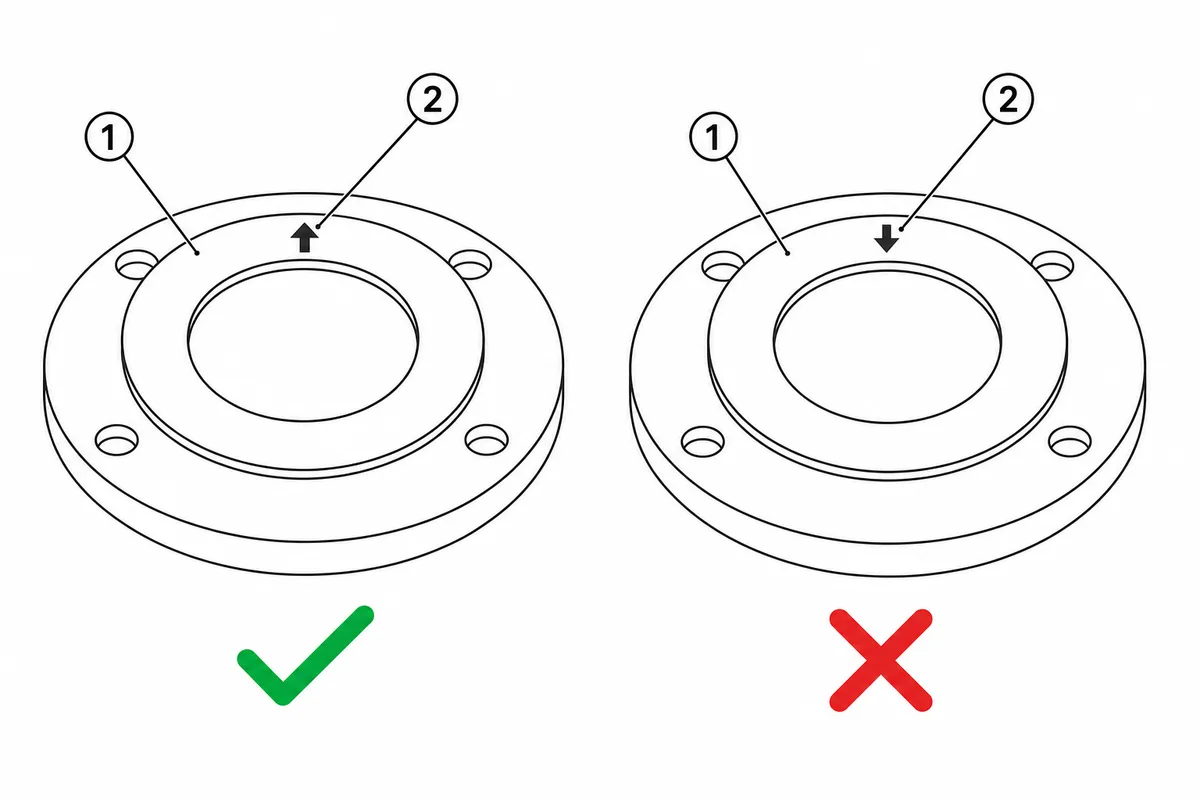
7. 불량 유형을 표시합니다. 라인에서 실제로 불량이 났던 곳마다 올바른 예/잘못된 예 패널을 넣습니다. 올바른 방향에는 체크, 실제로 나왔던 잘못된 방향에는 엑스. 그 공정이 겪은 시행착오가 그대로 담기므로 문서 전체에서 가장 가치가 높은 도해입니다.
8. 그 작업을 해 본 적 없는 사람에게 테스트합니다. 다른 라인 사람에게 초안을 건네고 말없이 지켜보십시오. 머뭇거리거나, 묻거나, 임기응변하는 곳은 모두 읽는 사람이 아니라 문서의 결함입니다. 처음 보는 사람이 질문 없이 끝낼 때까지 고치고 반복합니다.
9. 개정 번호를 매기고 승인을 받습니다. 날짜, 개정 번호, 작성자, 승인자를 기입한 뒤 최신 개정본을 작업 현장에 두고 옛 사본은 회수·폐기합니다. ISO 9001의 문서화된 정보 관리 요구와도 맞닿는 부분입니다. 배포 플랫폼이 있다면 플랫폼이 할 일이고, 없다면 고정된 작업지시서 양식으로 만든 관리 PDF로도 규모가 커질 때까지는 충분합니다.
좋은 작업지시서 단계의 구성
잘 만든 작업지시서는 일부러 반복적으로 보입니다. 모든 단계가 같은 뼈대를 갖습니다.
- 단계 번호: 잠깐 눈을 돌렸다가도 다시 찾을 수 있을 만큼 크게.
- 동작 문장 하나: 동사가 분명하게. "끼운다", "체결한다", "확인한다". 짧은 한 줄로.
- 도해: 작업자 시점에서 본 공작물, 움직이는 부품 강조, 움직임에는 화살표.
- 굵은 글씨의 수치: 합격과 불합격을 가르는 숫자를 단위와 함께.
- 확인 항목: 제대로 됐을 때 보이고, 들리고, 느껴지는 것. "하우징과 단차 없음", "딸깍 소리", "기준선에 틈 없음".
확인 항목이 없는 단계라면, 실패를 처음 알게 되는 곳은 최종 검사입니다. 가장 비싼 곳에서 알게 되는 셈입니다.
사진인가, 라인 드로잉 일러스트인가?
둘 다 쓸 곳이 있고, 판단 기준은 잡음입니다.
사진은 외관 자체가 핵심일 때 유리합니다. 라벨 위치, 색상 코드, 외관 한도를 확인하는 경우입니다. 가장 빨리 확보할 수 있어서 대부분의 작업지시서가 사진 문서로 시작합니다.
라인 드로잉 일러스트는 형상이 핵심일 때 유리하고, 대부분의 단계가 여기에 해당합니다. 그림은 어수선한 작업대, 하우징의 반사광, 상관없는 부품 열일곱 개를 걷어 내고 중요한 하나만 남깁니다. 흑백으로 출력해도, 공정 모니터 크기로 줄여도 알아볼 수 있고, 작업대나 조명이 바뀌어도 유효합니다. 예전의 비용, 즉 도해 한 장마다 몇 시간씩 걸리던 트레이싱은 이제 무너졌습니다. 공작물 사진이 몇 분 만에 설명서용 라인 아트로 변환되고 콜아웃과 화살표도 같은 과정에서 더해집니다. 작업지시서 예시 모음에서 도해 스타일을 나란히 비교해 볼 수 있습니다.
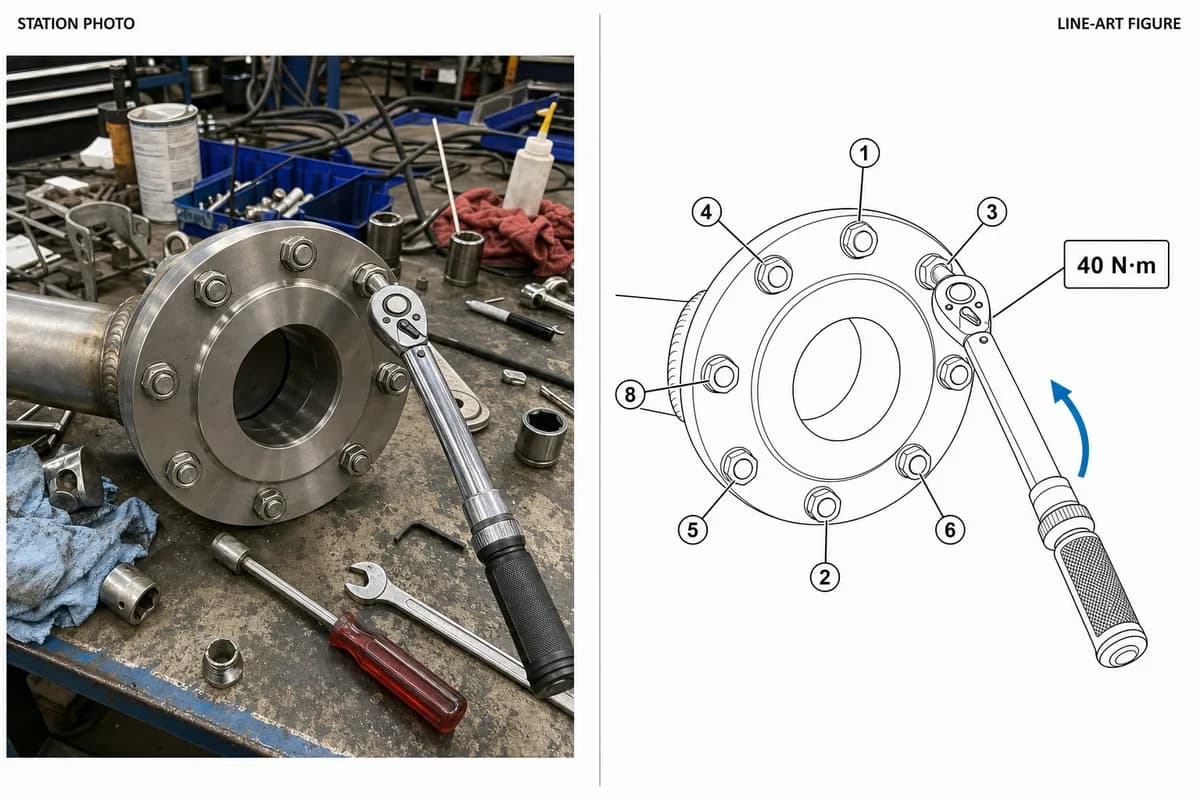
실무 패턴은 이렇습니다. 관찰하는 동안(1단계) 현장에서 사진을 찍고, 형상이 중요한 단계는 일러스트로 바꾸며, 외관 자체를 확인하는 단계에만 사진을 남깁니다.
작업지시서 예시 3가지
조립 공정: 플랜지와 개스킷. 8단계입니다. 부품 목록에서 개스킷의 방향 화살표를 콜아웃으로 짚습니다. 3~5단계는 도해입니다. 화살표가 위로 가게 개스킷 배치, 번호 순서대로 손으로 볼트 가체결, 대각선 순서로 토크 렌치 체결이며 단계 글에는 25 N·m를 넣습니다. 5단계에는 이 공장에서 실제로 나온 불량인 개스킷 뒤집힘을 보여 주는 올바른 예/잘못된 예 패널이 들어갑니다. 확인 항목: "플랜지 바깥으로 개스킷 가장자리가 어느 지점에서도 보이지 않을 것."
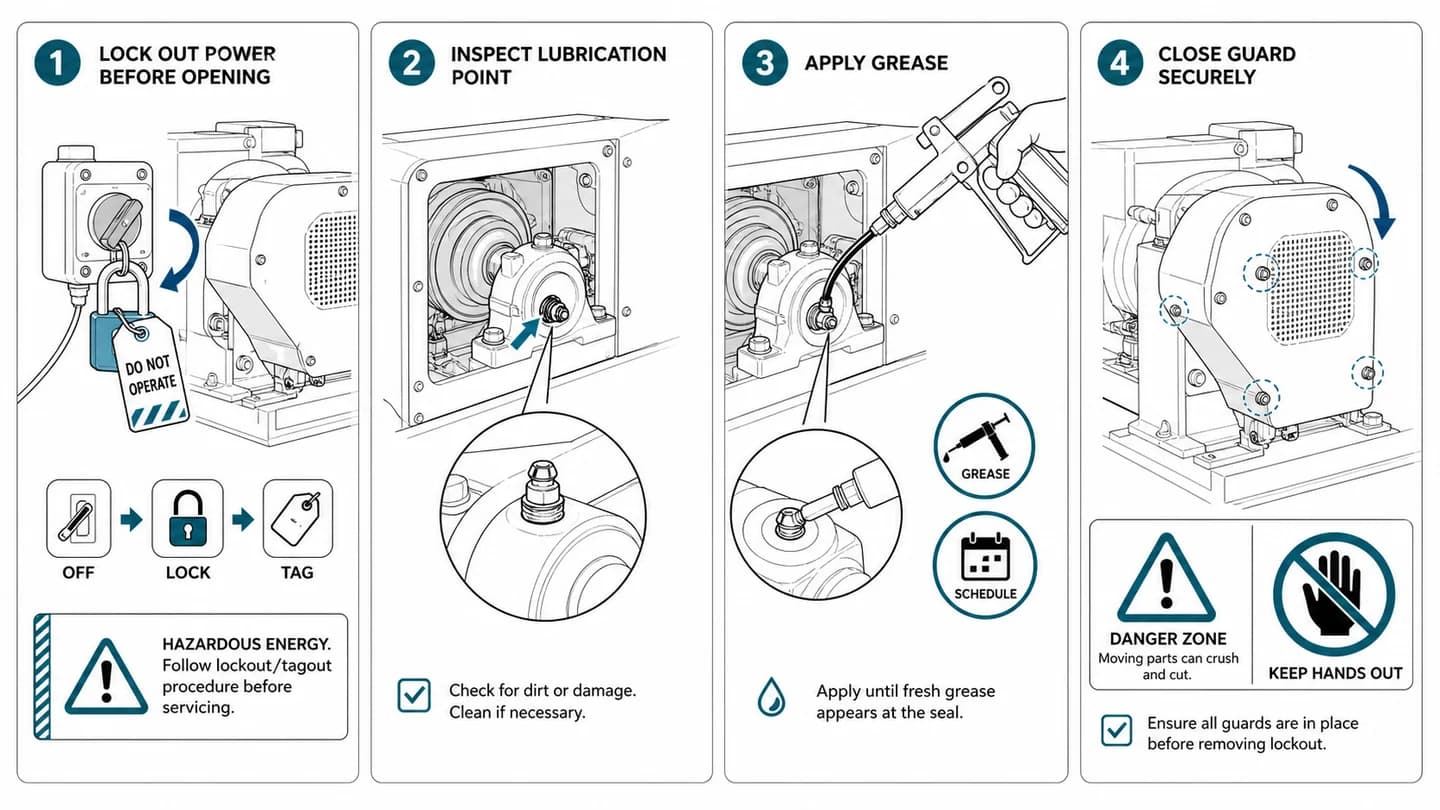
설비 보전: 포장기 필터 교체. 안전 블록이 먼저입니다. 잠금·표지(LOTO), 잔류 에너지 0 확인. 이어서 여섯 단계가 각각 도해와 함께 나옵니다. 커버 해제, 필터 회전 방향(곡선 화살표), 실 안착(홈을 확대한 원), 커버 토크 체결. 마지막 단계의 확인 항목은 "이상 없음 확인"이 아니라 합격 기준치가 있는 누설 시험입니다.
품질 검사: 소형 가전 최종 검사. 체크리스트형 작업지시서로, 항목마다 도해 하나와 한계값 하나가 짝을 이룹니다. 커넥터 완전 체결(단차 없음, 금도금 부분이 보이지 않음), 번호 매긴 도해와 대조한 나사 개수 확인, 표시 구역 안의 라벨 위치. 모든 항목은 합격 아니면 불합격입니다. "품질 확인"은 작업 지시가 아니기 때문입니다.
작업지시서 양식 (작업표준서 양식으로도 사용)
위 세 예시를 모두 담을 수 있는 작업지시서 양식 구성입니다. 작업표준서 양식으로 운영해도 항목은 같습니다.
- 머리글: 작업명, 공정, 개정 번호, 날짜, 작성자, 승인자.
- 안전 블록: 보호구와 에너지 차단 상태를 아이콘과 함께.
- 부품과 공구: 목록만이 아니라 그림으로 보여 주어 키팅 상태를 한눈에 확인.
- 단계: 번호 매긴 패널, 동작 하나 + 도해 하나 + 수치 + 확인 항목.
- 불량 유형: 이 공정에서 실제로 나온 불량의 올바른 예/잘못된 예 패널.
- 서명란: 플랫폼 없이 운영한다면 교육 담당자와 날짜.
작업지시서 양식 페이지에서 이 구조를 이메일 입력 없이 편집 가능한 Word 파일로 내려받을 수 있고, 모든 단계에 도해가 들어간 완성 예시도 함께 볼 수 있습니다. 현장용 도해 스타일은 제조 작업 지시서 생성기에서 따로 다룹니다.
ManualFig가 맡는 부분, 그리고 맡지 않는 부분
ManualFig는 이 과정 중 6단계 하나를 맡습니다. 공작물 사진을 라인 아트 도해, 번호 매긴 패널, 화살표, 올바른 예/잘못된 예 비교로 바꿔 단계를 읽기 쉽게 만듭니다. 공정 지식을 대신 채워 주지는 않습니다. 토크 값, 순서, 확인 항목은 반장·라인 리더와 작업 관찰에서 나옵니다. 배포 플랫폼도 아닙니다. 개정 관리, 작업자 서명 확인, MES 연동은 시장의 플랫폼 쪽이 할 일입니다.
자주 묻는 질문
작업지시서는 얼마나 자세해야 하나요?
기본 교육만 받은 처음 보는 사람이 질문 없이 작업을 끝낼 수 있을 만큼입니다. 8단계의 테스트가 바로 이것이고, 시간이 지나도 흔들리지 않는 유일한 기준입니다. 그 이상 자세하면 수율은 그대로이고 읽는 부담만 늘어납니다.
작업지시서 하나 작성하는 데 얼마나 걸리나요?
8~12단계 정도의 일반적인 공정 작업이라면 관찰과 초안 작성에 오전 한나절이면 됩니다. 예전 병목이던 단계별 도해는 이제 사진에서 한 장당 몇 분이면 나오므로, 단계마다 도해 한 장이라는 원칙을 감당할 수 있게 되었습니다.
작업지시서는 누가 작성해야 하나요?
두 사람이 짝을 이루는 것이 좋습니다. 작업을 아는 사람(반장, 숙련 작업자)이 노하우를 제공하고, 한 걸음 떨어진 사람이 글을 씁니다. 전문가는 스스로 의식하지 못하는 단계를 건너뛰기 때문입니다. 둘 다 놓친 것은 처음 보는 사람 테스트가 잡아냅니다.
작업지시서와 작업표준서를 따로 만들어야 하나요?
회사의 문서 체계에 따라 다릅니다. 표준(작업표준서)과 현장 배포용(작업지시서)을 나누는 곳도 있고, 하나로 운영하는 곳도 있습니다. 중요한 것은 현장 작업자가 보는 문서가 위의 원칙대로 한 단계 한 동작, 도해, 수치, 확인 항목을 갖추는 것입니다.
관련 글: 작업지시서 예시와 샘플, 작업지시서 프로그램 비교, 작업지시서 양식.
작성자

연구자 · University of Arts in Poznan
Davie Chen은 University of Arts in Poznan 애니메이션·인터미디어 학부 연구자로, 과학 도해, 특허 일러스트, 설명 도해, 학술 글쓰기에서 생성형 AI를 활용하는 방법을 연구합니다. ManualFig AI는 이 연구를 제품으로 확장한 도구 중 하나입니다.
저자 프로필 보기카테고리
더 많은 게시글
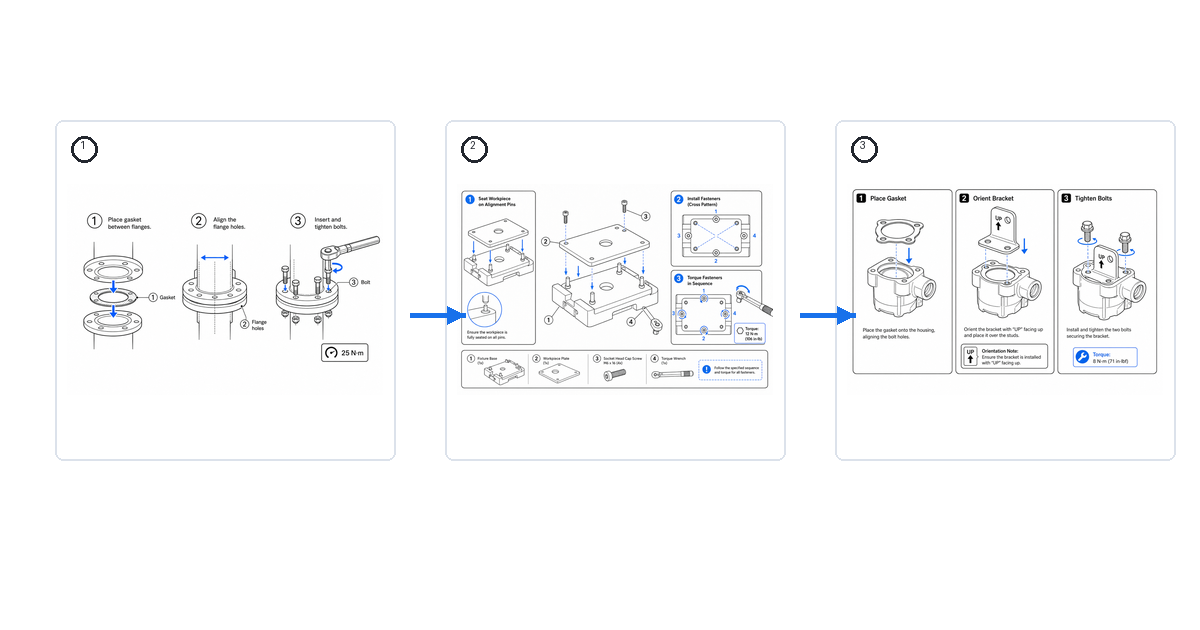
작업 지시서 예시와 샘플 (시각 자료 포함)
조립, 검사, 모델 교체에 쓰이는 시각적 작업 지시서의 실제 예시입니다. 좋은 샘플이 어떤 모습인지, 그리고 직접 만드는 방법까지 살펴봅니다.
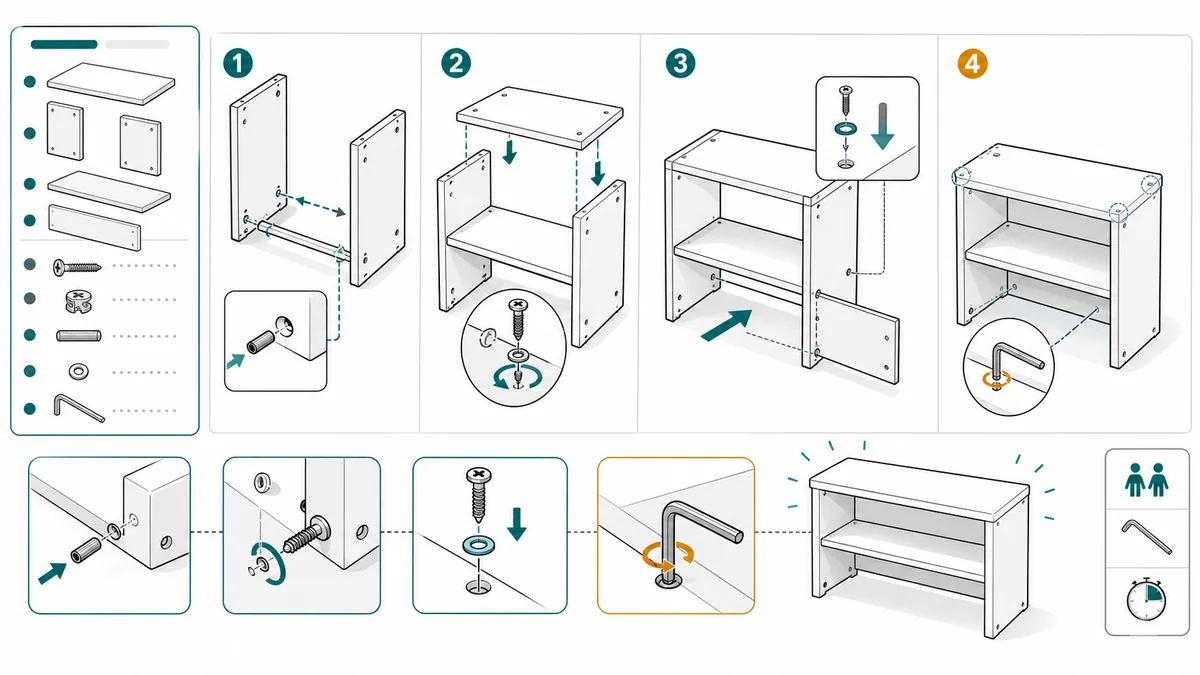
조립 설명서 도면: 화살표, 부품, 체결류, 레이아웃
조립 설명서 도면을 위한 실전 가이드: 패널 구조, 화살표, 부품 콜아웃, 체결류 디테일, 경고, 최종 확인까지 다룹니다.
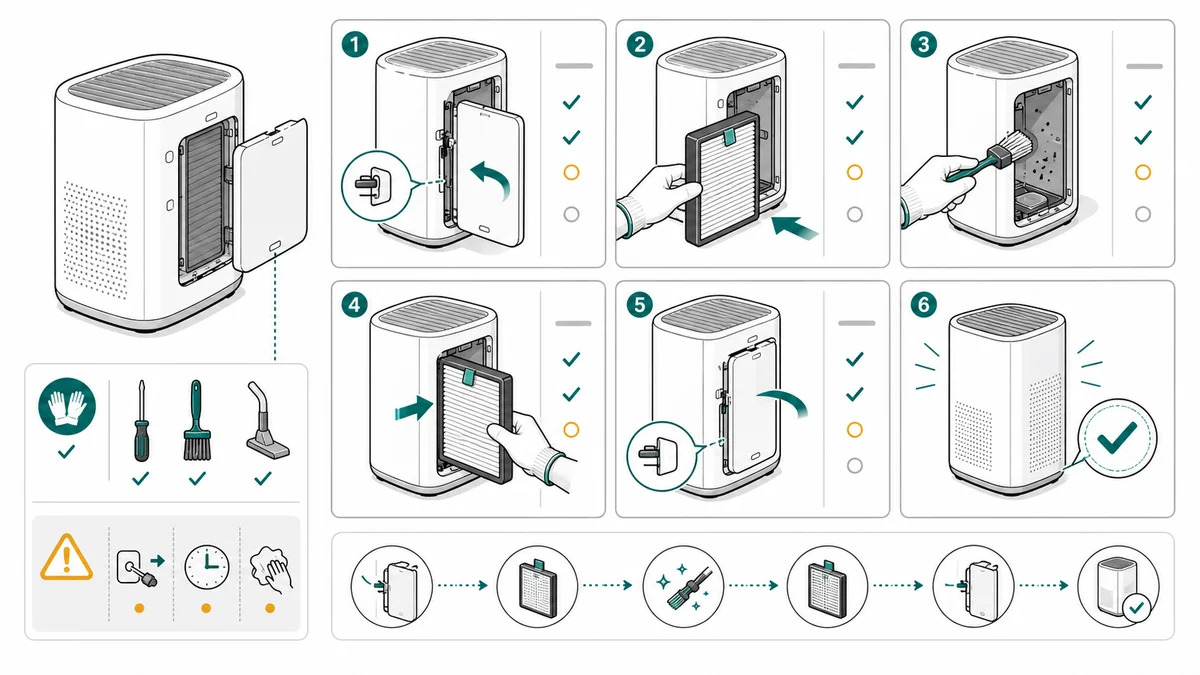
유지보수 절차 일러스트 체크리스트
세척, 교체, 점검, 필터, 정비 단계, 경고, 최종 확인을 위한 유지보수 절차 일러스트 제작 체크리스트입니다.