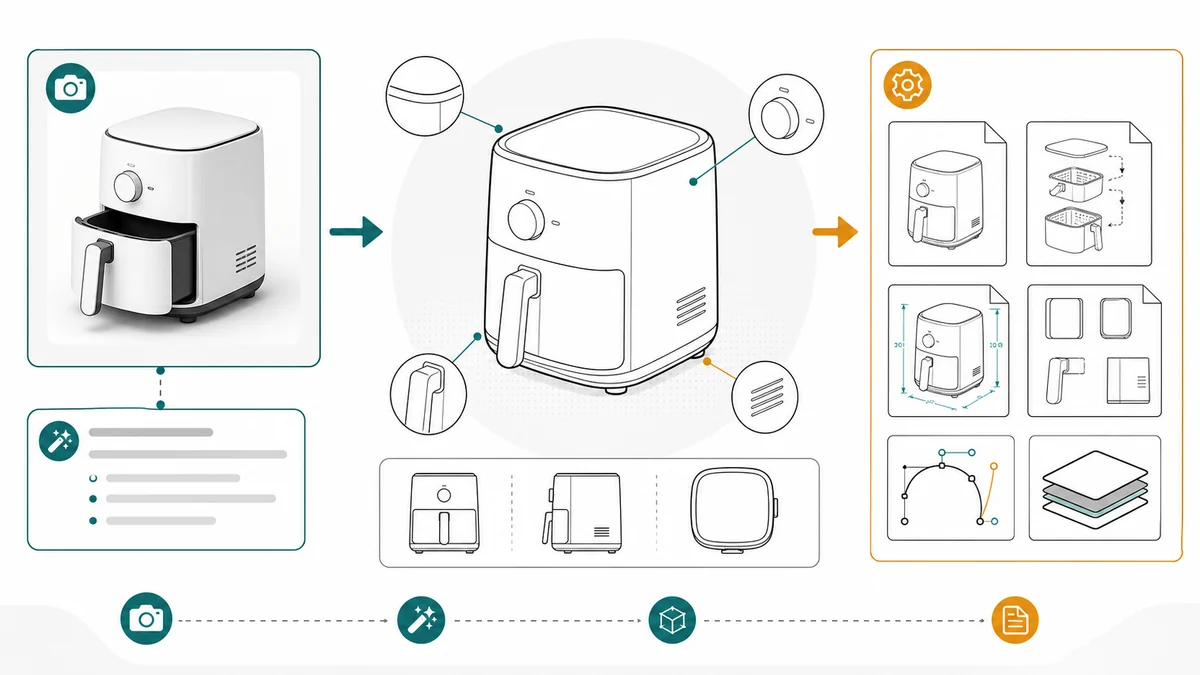
Product Line Art for Manuals: Examples, Prompts, and Output Formats
How to use product line art in manuals, packaging inserts, help centers, and support docs, with prompt examples and PNG/SVG output guidance.
A support team has three product photos of the same coffee maker. In every photo, the descaling latch the user needs to press is hidden behind a reflection on the brushed-metal case. The photos are sharp, well-lit, on-brand - and useless as instructions. Customers keep emailing screenshots of the latch they cannot find.
That is the gap product line art is meant to close. Not a prettier photo, but a different deliverable: keep the product silhouette, enlarge the part that matters, and put an arrow on the action the user has to take next.
ManualFig generates that deliverable from the same source assets a team already has - product photos, CAD screenshots, supplier images, sketches - with arrows, callouts, detail views, and exports that fit print and digital channels.
Need the workflow page? Open the Product Line Art Generator.
Common mistakes to avoid
The most common mistake is treating product line art as a prettier version of a product photo. Manual art has a different job. It should remove everything that does not help the reader identify the part, understand the motion, or confirm the final state.
Avoid these patterns:
- Keeping marketing shadows, reflections, lifestyle props, or decorative backgrounds
- Showing the whole product when the step only concerns one latch, tab, port, or filter
- Drawing every screw, seam, and texture with equal visual weight
- Using arrows that point near the action but not exactly at the user contact point
- Adding labels that will become too long after translation
- Letting generated art invent logos, certification marks, model numbers, or dimensions
Good line art is selective. It keeps the silhouette, the important interface, and the action cue. Everything else should fade into lighter lines or disappear.
Where product line art fits
Use line art when the reader needs to identify a product or part quickly without reading a paragraph first:
- Product manuals and user guides
- Packaging inserts and quick start cards
- Help center articles
- Setup and care instructions
- Support macros and training pages
- Ecommerce product support images
- Technician training slides
Photos can still be useful as internal references. The public manual asset should usually be simpler.
Use a photo when the exact surface finish, color, or real-world condition matters. Use line art when the reader needs direction. A setup sheet, maintenance checklist, or replacement guide usually benefits from line art because the action can be made larger than it appears in the original photo.
What a useful line-art figure needs to show
Before generating, write down the job of the figure. A product overview drawing, a part callout, and a step panel need different prompts.
For a product overview, include:
- The product from the most recognizable angle
- The main controls, ports, covers, or removable parts
- A few callouts, not a full technical drawing
- Enough blank space for captions or numbering
For a step figure, include:
- The part being touched
- The user's hand, tool, or replacement part if it clarifies the action
- A directional arrow that matches the motion
- A completion state, such as locked, seated, aligned, or ready
For a support article, include:
- The symptom location, such as a light, button, latch, leak point, or connector
- A close-up if the detail is small
- A correct/incorrect state when users often make the same mistake
Prompt templates
Start with a single product drawing when you need a reusable base asset:
Create clean product line art from this product photo.
Show the front view of the device, one removable filter callout, and one arrow showing removal direction.
Use black line work on a white background, minimal gray shading, no logo, no shadows, no brand text.
Leave space below for a caption.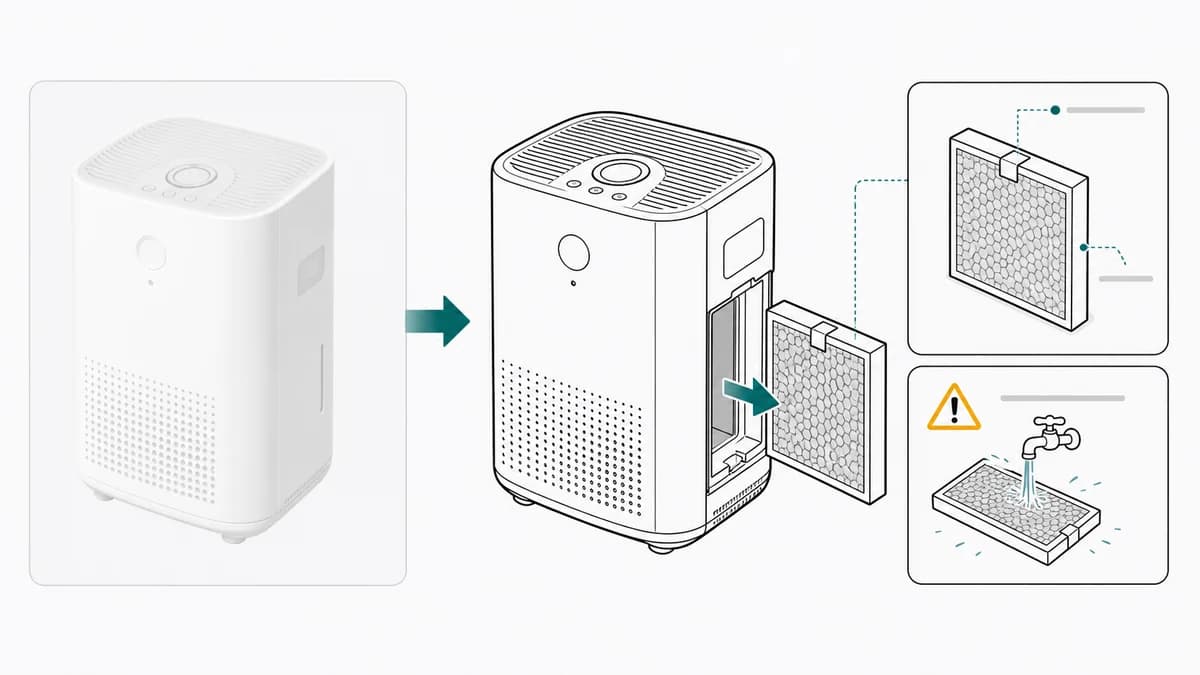
For a multi-step manual, add panel structure and final state:
Create a three-panel manual line art sequence.
Panel 1: open the cover.
Panel 2: pull out the cartridge using a curved arrow.
Panel 3: insert the replacement cartridge and show OK final state.
Use one action per panel, numbered steps, short labels only.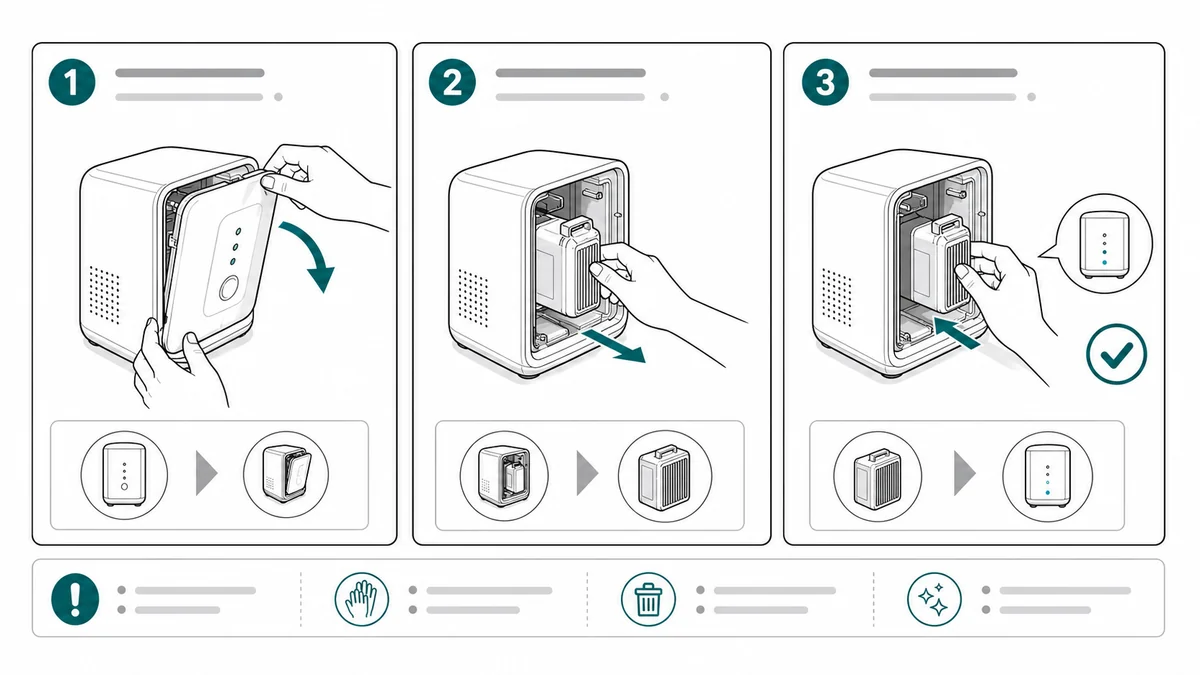
For a support or troubleshooting article, make the symptom explicit:
Create a support guide line-art figure for a product that will not power on.
Panel 1: check that the charging cable is fully seated in the rear port.
Panel 2: press and hold the power button for 3 seconds.
Panel 3: show the ready indicator light.
Add one close-up callout on the charging port.
Use clean manual line art, blue arrows, no brand marks, no realistic shadows.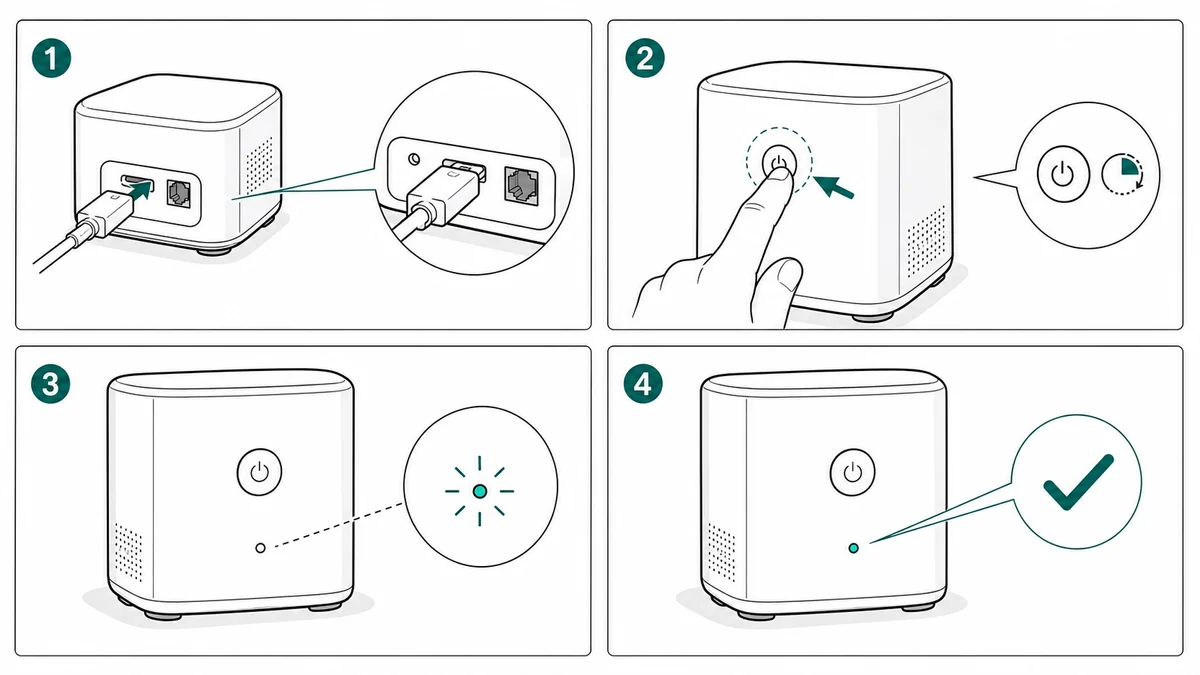
For an ecommerce insert, reduce detail:
Create compact product line art for a packaging insert.
Show the product, charging cable, power button, and first-use ready light.
Use large simple arrows, very short labels, and enough margin for print layout.
No logo, no decorative background, no small unreadable details.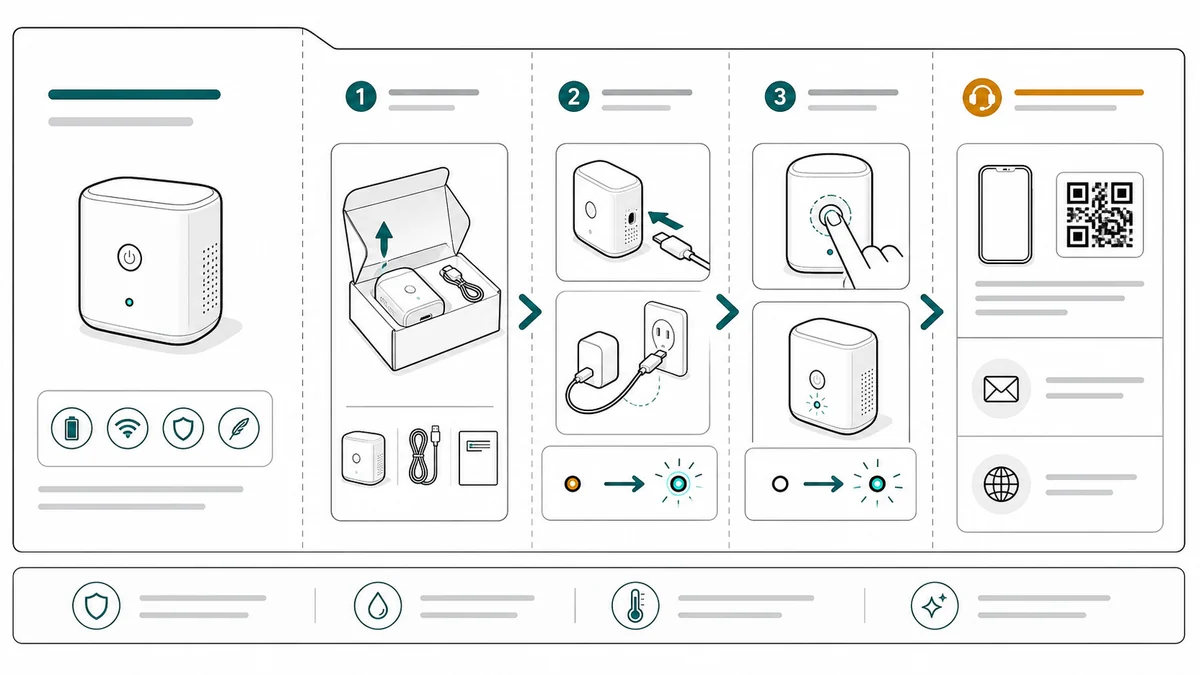
A practical ManualFig workflow
ManualFig works best when you treat the photo as a geometry reference and the prompt as the instruction design brief.
- Upload the clearest reference you have: product photo, CAD screenshot, supplier image, or existing manual page.
- Describe the intended document: user manual, quick start guide, help center article, packaging insert, or support reply.
- Name the view: front, rear, top, underside, cutaway, close-up, or three-quarter view.
- Name the action: open, pull, twist, align, insert, lock, charge, reset, replace, or inspect.
- Add required cues: arrow type, callout, warning icon, OK/X state, tool, orientation, or final check.
- Generate a few variants, then revise the one closest to the actual product.
- Convert to SVG when the image needs to scale in print or a documentation system.
This is faster than asking for one perfect final figure. The first generation should establish the shape and action. The second pass should fix labels, arrows, crop, or missing parts.
Output formats: choose by reuse, not by aesthetics
Most teams pick PNG by default and only switch to SVG when something breaks. By then the figure has already been re-exported four times at different sizes and the arrows no longer line up. A better rule: choose the format based on how many times and at how many sizes the figure will be reused.
A two-question decision tree
- Will this figure live at exactly one size, on one channel? Use PNG. Examples: a help-center article, a support reply screenshot, an internal review draft.
- Will this figure appear at two or more sizes - print + web, manual + insert, A4 + thumbnail? Use SVG. The same arrow, label, and line weight need to scale without re-rendering.
If the answer is "I do not know yet," default to SVG. Downgrading SVG to PNG is one click. Going the other direction means a new generation. And if the figures will be opened in Illustrator, choose a stroke-based SVG workflow so line weights stay editable — see Image to SVG for Illustrator: editable strokes.
What breaks when you PNG a figure you should have SVG'd
- A 1200px PNG dropped into a printed A4 manual ends up at 96 dpi - arrows and labels blur, and the print team sends it back.
- A help-center figure rebuilt at 2400px to satisfy a retina screen now exceeds the page weight budget. Editors compress it again and the line weights get muddy.
- A figure reused at three sizes ends up with three slightly different versions in the system. When the product latch changes shape, only the largest one gets updated.
SVG avoids all three because the figure is regenerated at the size it is rendered, not stretched from a fixed bitmap.
When PNG is actually the right call
PNG is the correct format when:
- The figure includes generated shading, gradients, or photo-derived texture that an SVG export would lose.
- The audience is one channel only, like a single support macro or a one-off email.
- The publishing system rejects SVG (some help-center platforms still do).
- The reviewer needs a quick visual without opening a vector editor.
Many ManualFig outputs work fine as PNG for the first review pass. Convert the approved version to SVG only when reuse becomes likely.
Keep the source alongside the export
Whatever format you ship, archive the prompt, the reference image, and the chosen output together. A future update - new latch shape, new warning, new model number - is then a prompt edit, not a redraw. ZIP exports matter most when the figure belongs to a numbered sequence: panel 1 cannot be regenerated alone if you have lost the style anchor.
What to review before shipping
Before shipping line art, check:
- Does the product still look recognizable from the user's point of view?
- Is the important part larger or clearer than it was in the photo?
- Are arrows attached to the actual user action?
- Are callouts used only for details that would otherwise be too small?
- Are labels short enough for translation?
- Are warnings close to the risky step?
- Are invented logos, marks, dimensions, or certification symbols removed?
Product line art is not CAD. If dimensions, tolerances, compliance statements, or safety claims matter, route the final figure through the responsible reviewer.
How different teams should use this
If you are a product manager, use line art to turn the first-use flow into a quick start guide before the full manual is finished.
If you are a support lead, turn repeated support questions into small line-art checks: where to press, where to look, and what the correct state looks like.
If you are a documentation writer, use line art as the visual base for manuals, packaging inserts, and help center articles so the same product shape appears everywhere.
Explore related workflows: Photo to Line Drawing for Manuals, Packaging Insert Instruction Generator, Instruction Manual Generator with Pictures, Quick Start Guide Illustration Generator, and the AI Manual Illustration Generator.
Author

Researcher · University of Arts in Poznan
Davie Chen is a researcher at the Faculty of Animation and Intermedia, University of Arts in Poznan, studying generative AI for scientific figure creation, patent illustration, instruction graphics, and manuscript drafting. ManualFig AI is one of the research-to-product tools built from this work.
View author profileCategories
More Posts
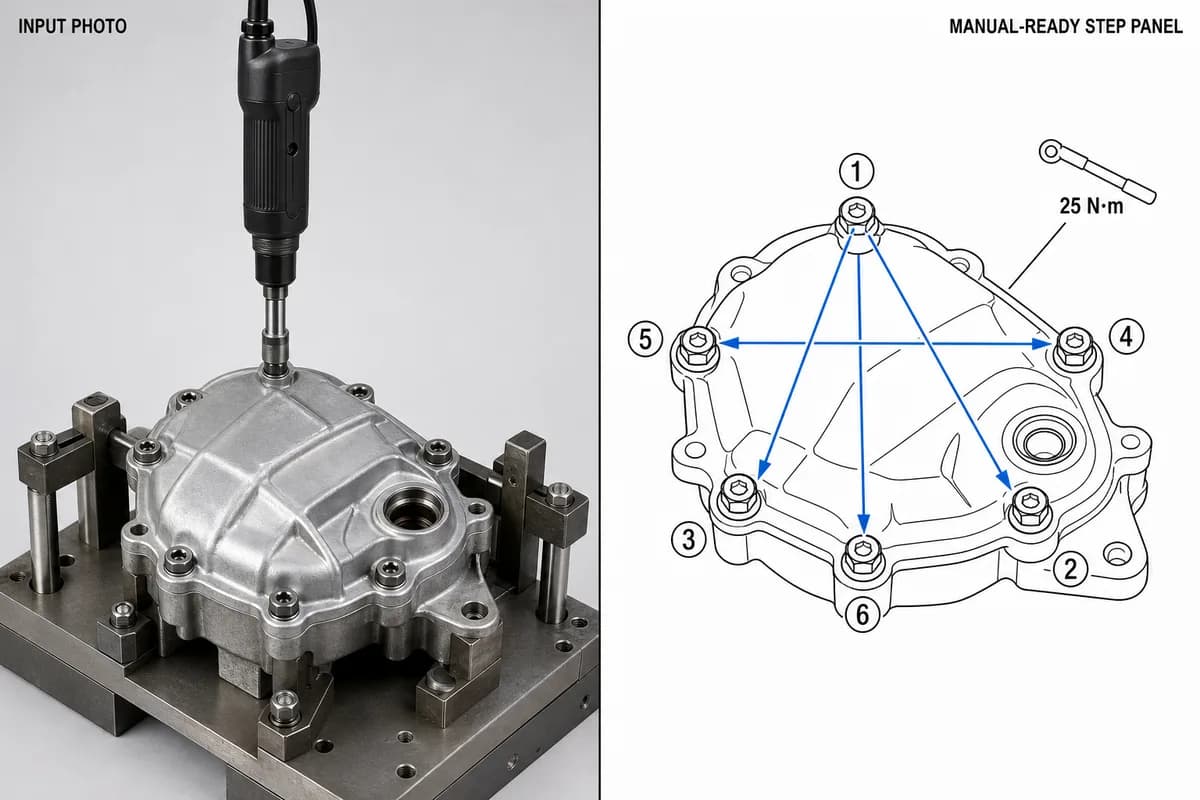
Manufacturing Assembly Instructions: Format, Examples, and How to Illustrate Each Station
What a manufacturing assembly instruction must contain, how to lay out one step per page, three worked station examples (torque, orientation, inspection), and a template you can copy.
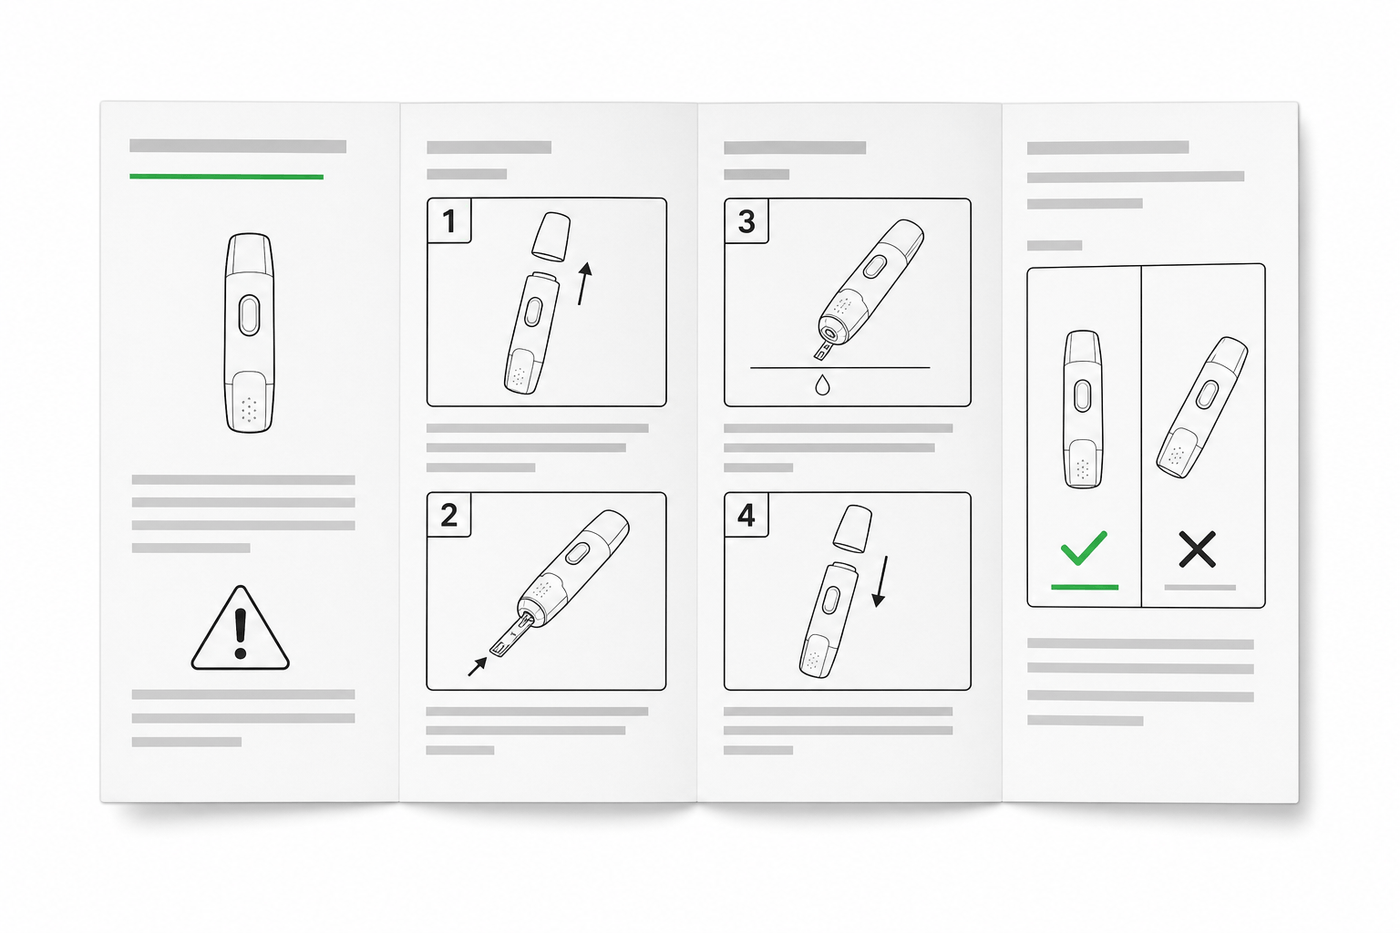
IFU Design Guide: Layout, Symbols & Examples
Practical IFU design guidance for medical devices: page layout, ISO 15223-1 symbols, warning panels, illustrations, and a reusable section template.
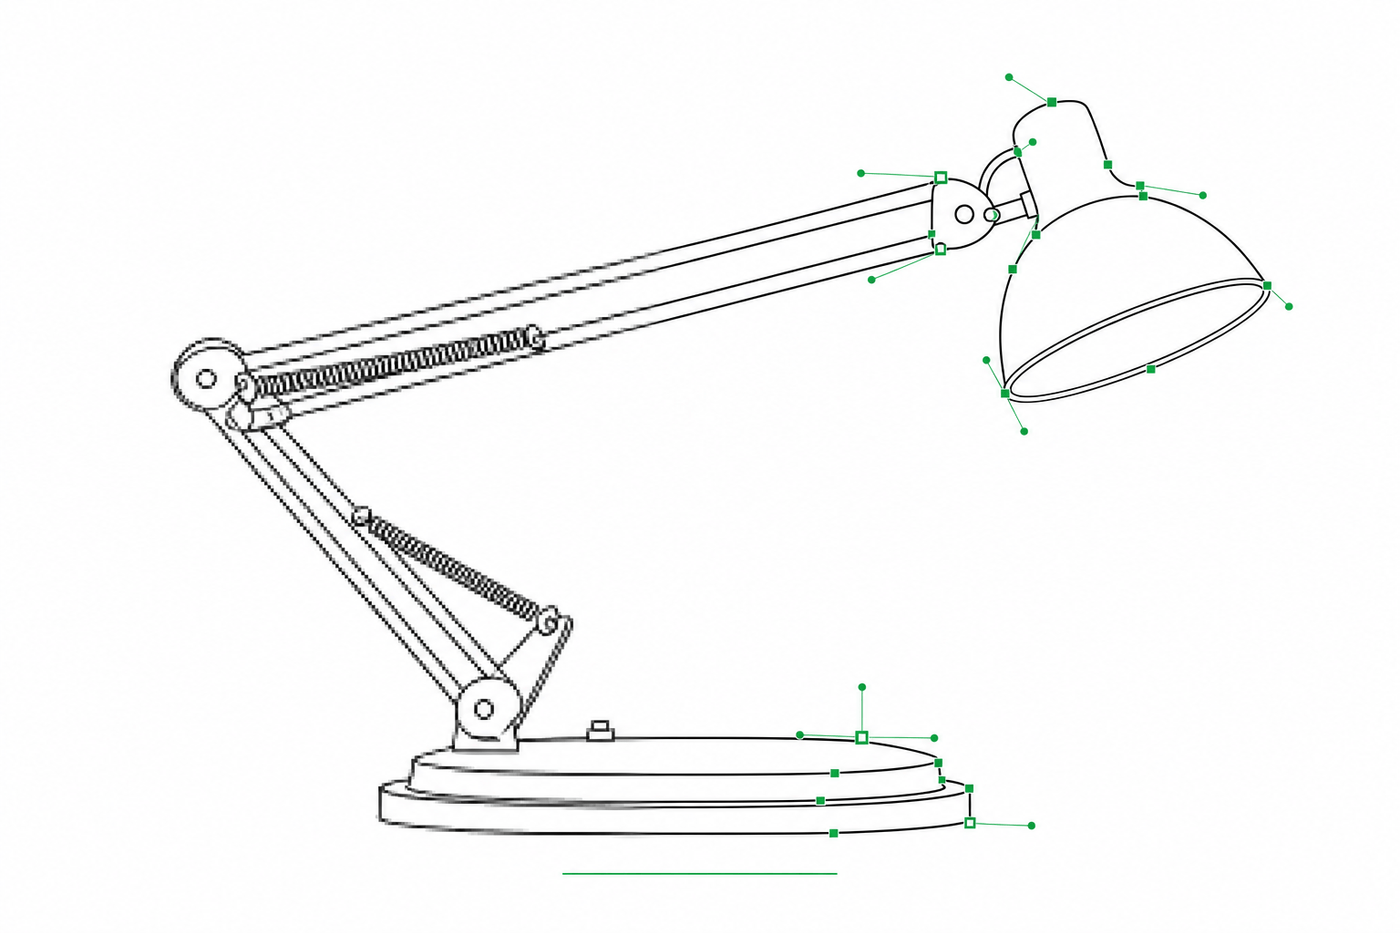
Image to SVG for Illustrator: How to Get Editable Strokes for Technical Line Art
Why many image-to-SVG conversions arrive in Illustrator as filled outlines you can't restyle — and two workflows that produce stroke-based, centerline-style SVG line art with adjustable line weights.